Monthly Archives: December 2009

The Seven Habits of Highly Effective Geeks

The Seven Habits of Highly Effective Geeks

2009-12-22

by Richard White

I’ll admit right from the start that I have no idea if these techniques align with anything Stephen Covey mentioned in his book (which I haven’t read), but here they are: seven things that will improve the way you work on the computer.

These aren’t sexy, high-gloss, applications that you need to download. No, these are mostly relatively simple, under-the-radar habits that you can incorporate into your Mac, Windows, or Linux workflow immediately, just in time for the New Year (if you’re in need of any easy-to-fill resolutions).

Let’s get started!

1. Organize your directories

If your Documents folder is full of a bunch of random files, or—worse yet—your Desktop is filled with a bunch of random files, you need to clean up your act. Get those files organized into a series of logically organized and nested folders that will give your brain a strong sense of place location.

I don’t care how powerful your operating systems search function is, there’s a benefit to keeping all your receipts in one folder, all of your emails in another folder, all of your materials for Project X located in the Project X folder.

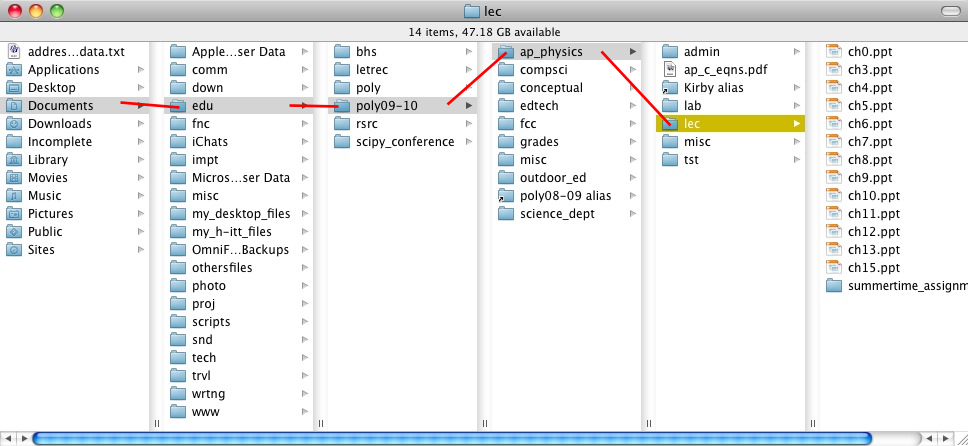
And while you’re at it, switch your file system view from Icon to List view, so you can see that nested file structure.

Here’s a partial glimpse of what mine looks like. Here, a series of PowerPoint lectures are contained in the folder lec, which is contained along with some other folders in a folder for my ap_physics course, which is contained in a directory for this school year called poly09-10, which is grouped with all of my educational materials in a folder called edu, which is in turn contained in my Documents folder. Easy!

2. Print to PDF

Bookmarking websites is a great way of keeping track of those websites that you like to return to, but content on some websites has a unsettling way of disappearing. If you’re interested in keeping an archive copy of something—and article you read, or something you want to read later on when you are offline—you should make a PDF copy of it.

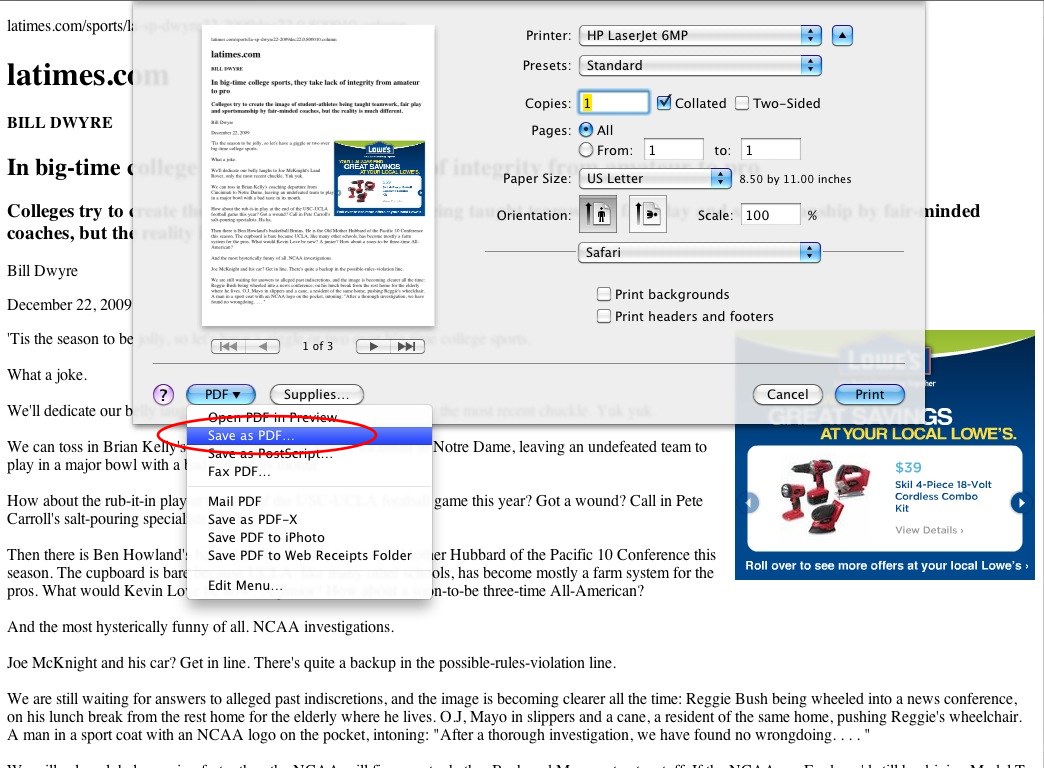
Apple, Windows, and Linux machines all have the capability of “printing” to a PDF formatted file on your local computer. This capability comes standard on Macs and on some Linux machines. Most Windows and Linux machines will need to have an additional bit of free software installed to make this happen. (Google “windows print pdf” to find out where you can get this software for windows, or “linux print pdf” for Linux.)

Not that many webpages include a “single page” option or a “print” button that will show you a page that removes much of the distracting navigation or ads that might otherwise clutter your PDF copy. Then select “Print” in your browser, and choose the PDF option in the Print dialog box. You’ll need to indicate a file name and location on your machine that the file will be saved. Then click “Print” (a bit misleading, because you’re really saving a file), and then you’ll have a local copy of the content, ready to read at your off-line leisure.

3. Take notes with a text editor

Whether it’s the Apple’s TextEdit, Windows’ Notepad, Linux’s gedit, or something a little more powerful—BBEdit (Mac), vim or emacs, etc.—everyone needs a lightning fast text editor that they can use to create little text files. Grocery lists, to-do items, a note on the desktop with the title of that book you need to order… using Microsoft Word or Excel to keep track of a few kilobytes of text is overkill.

4. Organize your bookmarks

All web browsers—Firefox, Chrome, Safari, Internet Explorer, etc.—provide you with the opportunity to bookmark frequently visited pages. If you have a LOT of bookmarks, you should definitely consider organizing them into folders, and then perhaps keeping those folders in a “Bookmarks Bar” at the top of your browsing window.

Even better, don’t bookmark the website itself; bookmark the RSS feed for the site, which will inform you when new content is posted by placing a small number indicating the number of unread articles next to the name of the bookmark.

Here, for example, I have 19 blog postings that I haven’t yet read, and 6 educational technology articles that I need to look at at some point.

If you don’t mind others having access to your bookmarks, you might also consider taking advantage of http://del.icio.us, which allows you to subscribe to and sync browser bookmarks across multiple machines.

5. Make a daily backup

The new mantra, courtesy of Leo Laporte and the fine folks at T.W.I.T., nicely summarizes the minimum requirements for keeping your data safe: “3 Copies, 2 Media, 1 Offsite.” In other words, you should have at least three separate copies of your data, stored on at least two different types of media, with at least one of those copies stored offsite (where a local catastrophe can’t harm it).

This is easier than ever to do. Optical disks (CDs and DVDs) are on the way out, and flash drives are still too expensive for their limited capacity. Here’s how you get started:
a. Get an external hard drive and configure your computer to keep a copy of your computer’s files once a day on there. Use Apple’s Time Machine, or Windows’ archive feature, or create a nice little shell script featuring rsync if you use a Linux machine (more on this another time).
b. Subscribe to Mozy, or Backblaze, or one of the other offsite services that, for a pathetically reasonable fee, will backup your entire machine (and, in the case of Backblaze, any external hard drives you have attached to it) for pennies a day. Or maybe it’s nickels a day. Yeah. It’s about 3 nickels a day. For bulletproof, offsite, backup!)
Then you can stop worrying about losing your data. Because you will lose data from your main machine. It’s a fact. You just want to be sure that you have another copy of it so you can easily get it back.

6. Stay in touch (email processing, blog, Twitter, social networking)

We don’t work in isolation. “The more you share, the better,” and computers excel at allowing you to keep in touch with friends, family, colleagues, etc., to an extent that can sometimes feel overwhelming.

The web is full of advice on how to be an effective blogger, or Twitterer, and if you find that at all interesting, by all means explore it. I would suggest that, as technologists, each of of should have at least a passing familiarity with the technology. I’m not on Facebook every day, but I have an account, and update my status every once in awhile, just so people know I’m not dead. I don’t have a long list of tweets, but I follow a few people, and am followed by others, and I occasionally observe as the wave of some recent hot topic builds, crests, and collapses onto itself (it’s fascinating to watch!).

And I have a blog or three (this, one of them) that I use to keep in touch with people in my life, both friends and colleagues. Blogs aren’t for everyone, of course, but as always, it’s great to play with the technology a little bit to see how it all works.

And everyone can deal with Facebook. Double-check your privacy settings and guard your personal information, by all means, but check it out and see what’s going on there. Again, as technologists, we need to be familiar with this stuff.

7. Manage your schedule (calendar, project software, task lists)

Computers have been used for managing calendars and to-do lists from the very earliest days, and the software has only gotten better with time. Everyone can benefit from using Google’s free, online Google Calendar, or Apple’s iCal, or any of the calendar options available on Windows machines. If you’re busy—and you know you are!—you should be using calendar software to help keep your life organized. You get bonus points if that calendar is kept up-to-date and synced regularly with your smartphone (iPhone, Droid, etc.)

Best of all, your brain, once cluttered with “Don’t forget to do X,” will tend to experience less cognitive overload, and be free to do what it was really meant to do: think creatively.


Chances are, I’m preaching to the choir on this one, but on the off-chance that you’ve ignored some of these up to now, consider this a gentle reminder. None of these items are terribly sophisticated, or beyond the scope of any of us. They’re just good, solid tips that will make your life a better place to be.

Any items you’d like to add to the list? Leave a comment!
Collecting Student Info w/ Google Docs

Collecting Student Information with Google Docs

2009-12-13

by Richard White

In addition to teaching—interacting with our students in one way or another to guide them in learning new material—most of us find ourselves in the position of collecting various forms of data on our students: attendance, essay responses to questions, test scores, evaluations of their projects, etc.

There are two sets of data that I collect from year to year that have been especially helpful to me. One is a “Student Information Form.” Students at the beginning of the year are asked to give me the usual name, address, phone number, email address, along with contact information for their parents/guardians, the students screen name (if they chat), their favorite musical artists (interesting to me), and anything else they’d like to mention to me at the beginning of the school year.

In the good old days I’d collect that information on a piece of paper with purple text, smelling of chemicals and still slightly damp from the ditto machine. Then the school got a photocopier. A few years ago I set up an online form that students would fill out, with the results of the form emailed to me so that I could easily process and compile them into a spreadsheet.

Enter Google Docs, and the outstanding Forms option. Now, with a Google account and Docs, you can have Google do the heavy lifting for you. For this example, I’m going to use another type of form that I use to collect information from my students, but this time, it’s information on me. A teacher/course/text evaluation is something I’ve used over the years to track my own teaching, and get ideas from students on how I can improve things. I’ve got a series of questions that I ask students to give me feedback on. We’ll use a subset of those questions for our example.

HOW YOU DO IT

1. Log into your Google account. (Don’t have one yet? Create one using the easy instructions.)

a

2. Under the “more” menu, select “Documents” to open up your Documents page.

b

3. Under the “Create new” menu, select “Form.”

c

4. Choose type of question you want to ask:
a. Text – a single line answer
b. Paragraph text
c. Multiple choice (radio buttons)
d. Checkboxes (more than one answer may be selected at the same time)
e. A list
f. A Scale response (as in “Likert scale”)
g. A grid

d

5. Indicate specifics for that question.

e

6. Add additional questions as desired by clicking on the Edit button.

f

7. Note that at the bottom of this Form editing page, a URL is given. This is the URL that you provide to students so that they can view the Form in a browser and begin entering information into it.

g

When you click on that link the form looks like this:

j

Here’s the interesting part: this form is really just a “front end” to a spreadsheet that is automatically generated when you create the form.

8. To see what your form looks like, and to test out the spreadsheet, go ahead and click on that link at the bottom of the form you’ve been editing. A new window will open up with the completed version of your form. I’m going to go ahead and fill out some test data. Once the form has been submitted, there’s a brief thank-you note from Google… and that’s it! The information has been entered onto my private spreadsheet.

k

9. I can access that spreadsheet by looking at the documents listed on my Google Docs page (you may need to reload the page if it’s a new form that you’ve created).

l

10. Click on that spreadsheet to load it into a new window where you can view its contents.

m

11. Note that this spreadsheet is not, by default, shared with anyone else. If you do choose to share with somone—colleagues, or even students—you can do so by clicking the “Share” button in the upper right of the window and selecting “Get the link to share…”

n

Here, you can indicate whether or not you’d like the sheet to be visible online (to anyone who has the link), and whether or not you want to give them the ability to edit the spreadsheet itself.

o
If you want to give only select individuals the right to view and/or edit the spreadsheet, click Share > Invite people… and enter the Google account email addresses of those people you want to invite.)

And that’s it!

Teachers have found lots of ways to leverage Google Docs’ Spreadsheet app and the Forms front end that you can use to automatically fill out a spreadsheet. As of this post, you can see how some people have done this here, and here. Or how about this Self-Grading Quiz?

The possibilities are endless!

Here comes Linux, part 3

Here comes Linux, part 3

2009-12-12

by Richard White

Linux Mint has lots of software included with it: Firefox for browsing, Pidgin for chatting, Thunderbird for email, OpenOffice for working with Microsoft Office documents (Word documents, Excel spreadsheets, PowerPoint presentations, etc.)

Chances are, though, that you’ll want to add software on your Linux machine, just as you would on any Windows or Mac machine. I know I did. I wanted to add Skype so that I could videoconferencing capabilities to my nifty little netbook. Other software I’d suggest you consider downloading more or less immediately is DropBox (cross-platform, cloud-based filesharing/syncing between all of your computers) and VLC (cross-platform video playback software).

Let’s look at how you install software on a Linux machine.

There are basically 3 ways, depending on what it is you want to install. In order of increasing complexity, you can:
a) use a “package manager” application that will help you find a install selected programs that have been prepared for your particular distribution;
b) download packages from the Internet and install them yourself;
c) download packages and “compile from source”.

If you’re brand new to Linux, you’ll probably want to stick to the first technique for now–it’s easier for you and safer for the data on your computer. Let’s see how it works.

Installing Skype (using the Linux Mint (Ubuntu) installer):
a. From the Linux Mint logo in the bottom-left corner, select Menu -> System -> Software manager
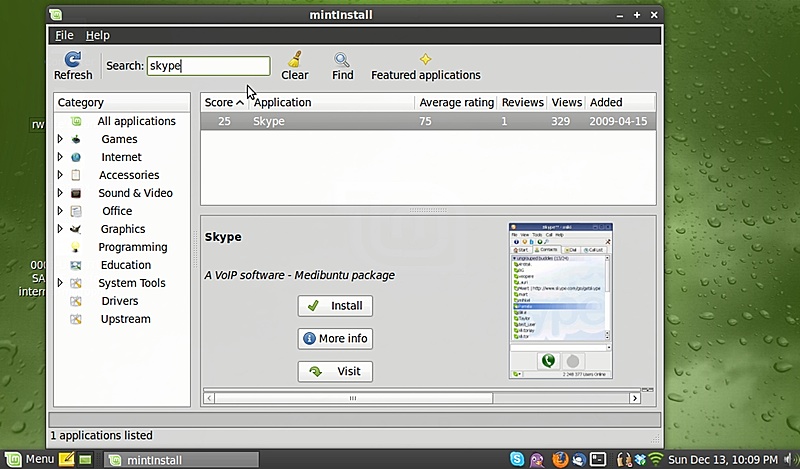
b. Click in the Search box at the top of the mintInstall window and enter Skype
c. Select Skype when it gets found, then click on the “Install” button.

mintInstall-skype

After the installation process is completed, go ahead and close the windows of the installer. You may need to restart the machine before some applications will work. You can launch the new application by clicking on Menu -> Applications -> Internet (in the case of the Skype application), or Menu -> Applications -> All applications and selecting it from the list there.

If you decide that you’ll be using this application, or any others, more frequently, you can click-drag the application from the Applications window down into the bar at the bottom of the window. Once the icon is down there, you can launch the application by just clicking on that icon.

We’ll talk a little more about the other ways that you can install software at some point in the near future. In the meantime, just because we’ve installed Skype on the Mini 10v, don’t think we’re in the clear yet! If you launch Skype, you may well find that the video works just fine, but the internal microphone on the Mini 10v doesn’t work.

What’s up with that? Investigation is ongoing…. In the meantime, if I need to run Skype, I’m using the Macbook Pro. “It just works.”

Here comes Linux, part 2

Here comes Linux, part 2

2009-12-09

by Richard White
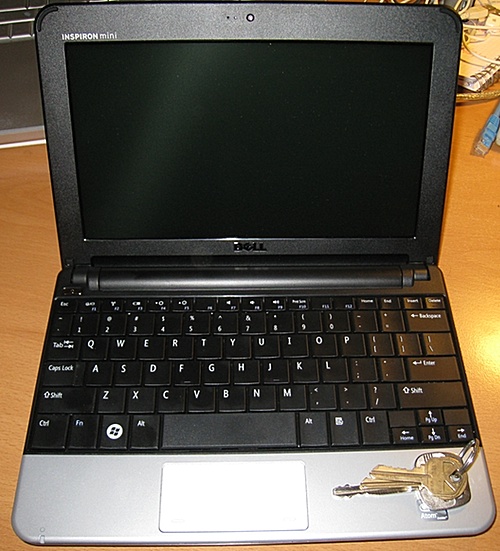
Dell Inspiron Mini 10V
The laptop showed up today.

The little Dell Inspiron Mini 10V, pretty much the cheapest little computer that you can get these days, showed up at work in a package quite a bit smaller than I was expecting. I cracked the cardboard open, lifted the lid, and raised my eyebrows. “Wow. That thing is small.”

Kevin the receptionist looked interested, so I pulled it out of the box and handed it to him. “Wow! That is small! You knew it was going to be that small, right?”

I guess I did. I’m not sure I knew it was going to be that small, though. I opened it up to find that the screen was even smaller (still 10-inches diagonally, as expected), but that my hands rested comfortably on the 92%-of-full-size keyboard. The school day was over, but with the arrival of the new machine, I was anticipating that I’d be spending the next few days getting this machine set up.

On this particular evening, though, the task was simple: get Linux Mint installed on the machine.

If you’ve never installed Linux before, there are a number of ways to do it. The easiest by far is to take a CD for a particular distribution (Ubuntu, Knoppix, Linux Mint in my case), boot the machine using that CD, and then install from the CD. I’ve done that before on a number of different machines, and it’s a relatively straightforward process that involves (usually) answering a few questions so that the operating system can be configured to your needs.

For the Dell 10V, the process is somewhat complicated by the fact that it doesn’t have a CD drive. Welcome to the future. Blue-Ray to the contrary, some machines are already losing their optical drives, which allow machines to be small & lighter, or to use valuable space for solid-state drives or batteries. But… how am I going to install the new operating system then?

Enter the flash drive. Modern PCs are able to boot from a flash drive, so it’s a “simple” matter of putting Linux Mint onto the flash drive and making that drive bootable, which I’d been smart enough to do a few days before. The excellent instructions at pendrivelinux.com explained how to get Linux Mint 7.0 onto a flash drive, which goes something like this:

  1. Download the Linux Mint 7 ISO.
  2. Burn ISO to a CD
  3. Insert your Linux Mint7 CD into a PC and boot from it. You’ll be running Linux Mint at this point off the CD. You can use the CD to install Linux Mint on the PC if you wish, but what we’re really interested in doing is creating a bootable USB flash drive for the laptop.
  4. Insert the USB flash drive into the computer running Linux Mint.
  5. From the list of Applications, open Terminal and type:
    sudo su
    apt-get install usb-creator
    usb-creator
  6. In USB Creator
    1. Select the USB disk
    2. Click the button “Make Startup Disk”
  7. IMPORTANT: Download a custom Linux Mint 7 syslinux.cfg file from pendrivelinux.com and copy it to the syslinux directory on your flash drive (overwriting the original).
  8. Eject the USB drive with Linux Mint on it.

So then I waited a few days until the Dell Mini showed up, and didn’t even really bother to boot into Windows XP, although I suppose I could have done that. But I’m a working man, and I don’t want to have to mess about with malware, viruses, and such, so I just decided to jump in and install Linux Mint on the entire thing:

  1. Insert the USB drive into the Dell Mini 10V while it’s turned off.
  2. Startup the 10V, and tap the F2 key a few times just as soon as the Dell logo appears in the startup process. This will get you into the BIOS and allow you to choose the USB drive as the startup disk.
  3. Use the right arrow key to select “Boot” in the top menu. Arrow down to select “USB Storage”. Use the F6 key to move “USB Storage” to the top of the boot list. Now, when the computer starts up, it’ll check the flash drive for a bootable device, which will allow your Linux Mint USB drive to start up the computer.
  4. F10 to Save & Exit the BIOS, and the computer should boot up off the flash drive.
  5. Follow the on-screen instructions to install Linux Mint 7 on your Dell Inspiron Mini 10V.

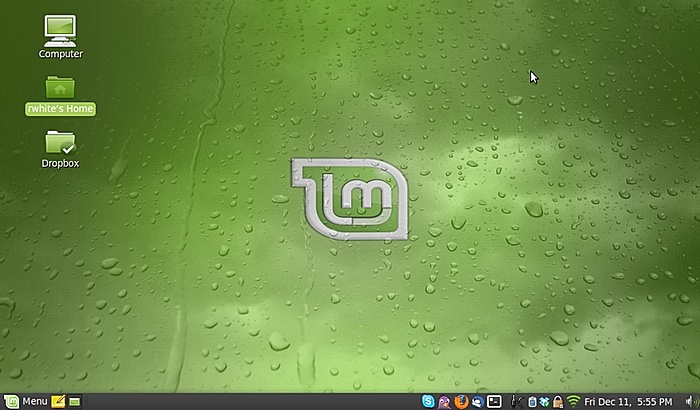
Linux Mint 7 homescreen

Stay tuned for additional information: additional software installs, strategies, etc.

Got your Elevator Talk ready?

I got an email from a student at my school this evening:

I’m supposed to write an article (300~500 words) on your website (http://learnapphysics.com/) regarding your AP physics question of the day. This article is going on the Paw Print. I’d love to have a small meeting or interview with you so I can gather some quotes and more information about your website.

So I guess it’s about time I brush up my Elevator Talk.

You know what an elevator talk is, right? For your business, your website, your project, it’s convenient to have a a brief, pithy, explanation of the thing, something that you can deliver to a complete stranger in 30-seconds or less (the time it takes to share small talk with someone in an elevator who says, “So tell me, what is it you do?”). The idea isn’t merely to summarize what you do, of course, but to intrigue the listener, to impress them even with what it is you or your project do. It’s personal branding, without the hard sell: you’re just making polite conversation.

Here’s the Personal Statement that I included on my resume a couple of years ago when I was applying for my current position: “I am a creative, high-energy teacher who enjoys working with students to develop their interest in the physical sciences. I am especially interested in the potential of using various forms of technology to encourage students’ educational growth.” Not terribly punchy, I’ll admit, but it was okay, back in the day. And I got the job, so…!

This is obviously NOT just about the elevator, is it? It’s about keeping your administrator informed about what’s been happening in the classroom these last few weeks. It’s about convincing Accounting that you really do need to attend that upcoming conference. It’s about making sure that 9th grader gets the details right when they’re putting together that story for the school newspaper.

So… what sound bites should I use for this little interview? What should I tell the journalist about this site? Any ideas? Leave a comment!

Cellphones are the new Laptops

IMG_0231
Will Richardson, at Weblogg-ed, has another fascinating post on how technology is transforming learning. This one discusses the incredible potential of the cellphone, based on both its increasing processing power and ubiquitous availability.

My good friend Michael, at Socratica.com, is interested in the same thing. (Disclaimer: I’m involved with this project.) Michael is interested in making learning available world-wide, and while the rest of the technology community struggles with how to distribute broadband networks across Africa, perhaps there’s some sense in using the network that’s already there: mobile phones.

No one is saying (yet) that lessons somehow delivered via a 2″x3″ mobile phone screen are going to replace a teacher and a well-equipped classroom. But we’re still in the early stages of this, and there’s lots of room for exploration here. And as teachers, more than anyone, we especially need to be open to the potential.

True story:

Two years ago I was teaching an introductory lesson on momentum to some 9th graders in a Conceptual Physics class. “One can calculate the momentum of an object by using the formula ‘p=mass times velocity,’ where ‘p’ stands for momentum.”

“Why ‘p’?” a student asks.

“Good question,” I respond. “I have no idea. You should look that up and report back to us tomorrow.”

A few minutes pass. A student in the back of the room raises his hand.

“Yes, Daniel?”

“Mr. White, I think that the ‘p’ might stand for a Latin word related to motion.”

“Wow, Daniel, I guess that makes some sense. Newton’s Principia was written in Latin, after all. That’s really interesting. And good for you for taking Latin!”

“Oh, I’m not taking Latin, Mr. White,” a slow smile spreading on his face as he brought out his cell. “I looked it up on my iPhone!”

We need more stories like this.

P.S. It turns out that Daniel was wrong about the Latin. The truth is that no one really knows about the “p”…