Category Archives: Workflow

Responsive Design in the Hybrid Classroom

Responsive Design in the Hybrid Classroom
2013-04-23
by Richard White

What is Responsive Design?

There’s a recent development in website design called “responsive design,” which refers to the design of a site so that it can easily be viewed on just about any device, from a giant monitor to a laptop, and on down to a tablet (iPad or otherwise) and a smartphone (iPhone or otherwise).

Early strategies for developing for these different types of devices consisted of designing two or more completely different versions of a website, with development and maintenance costs doubled or tripled as a result. More recently, a more reasonable approach has arrived: create a single site, but use Cascading Style Sheets (CSS) to customize display formatting depending on the device. So the site design “responds” to the device it’s being viewed on, and adjusts itself accordingly. Responsive design in web development is still a bit more complicated than it was in the good old days when all anyone used was 800×600 pixel monitors, but the payoff is this: people who visit a site using a mobile device–and these devices account for an increasing share of a site’s traffic–are going to have a much better experience.

So what?

But you’re not a web designer. Why are we talking about responsive design?

Just as mobile phones and tablets have caused designers to re-think their coding practices, it’s clear that changes in our students and the ways they learn is an opportunity to reconsider how we design our courses.

This is on my mind a lot as I tackle the development and organization of a course that I haven’t taught before, AP Computer Science. The teacher of any course is typically responsible for creating at least some of the content delivered in a course, or at the very least curating content and designing instruction and assessment strategies around that content.

A small sampling of some issues we consider when assembling a course:

  • What content will be delivered?
    • Is content available in a textbook?
    • Do I need to create my own content?
  • How will content be delivered?
    • Auditory lectures?
    • Whiteboard
    • PowerPoint
    • website
    • screencasts
    • PDFs
  • What activities support learning?
    • Homework
    • In-class activities
    • Worksheets
    • Laboratory experience
    • In-class activity
    • On-line activity
    • Field trip
    • Movie
    • Outside reading
    • Review sessions
  • How is feedback given?
    • During in-class discussions
    • Written feedback on assignments
    • Email
    • Peer review
  • How is learning assessed?
    • Projects
    • Quizzes
    • Tests
    • Cumulative Exams
    • Presentations

If you’re an experienced teacher than you almost certainly have already attempted to use most or all of these at one point or another in your teaching, and you’ve probably got your go-to list of favorite strategies that you use. But it never hurts to reflect a little on our practice, and re-examine what we do, particularly when a new course, or a new grade being taught, or even the arrival of a new academic year gives us a bit of breathing room.

Two Examples

From my own experiences in the last year, here are two quick examples of how I’ve reconsidered my teaching.

In both my Computer Science course and my AP Physics course I’ve become more committed than ever to making complete solutions of problem sets available to students online. It’s true that there will be some students who take advantage of this to copy work, but it’s my belief that there are a greater number of students who use the solutions as intended, i.e. as a resource to assist when stuck on a problem. Online solutions provide students with the support they need to make progress when I’m not immediately available, and I’m not comfortable with the idea of withholding those tools from some students based on a fear that some others will misuse the tool.

A second example from the Computer Science course is an assignment format inspired by a handout from a Michigan State University course (CSE 231) that I happened to stumble onto at some point. I’d been struggling to find a way to clearly state my expectations on assignments, as well as provide sufficient structure for the assignment so that students would better understand the solution strategies available to them.

On the one hand, I hadn’t wanted to give away too much information in the assignment sheets I handed out to students. On the other hand, I didn’t want things to be so vague that they had absolutely no idea of where to begin. The format of the CSE 231 assignment handout was shocking in it’s clarity, and inspired this new version of my project handouts. It features:

  • an Overview of the assignments, with a clear indication of the point value and due date
  • a Background section including general information about the context of the assignment
  • Program Specifications with a more specific detail of what must be included in the final program
  • a Deliverables description, with information on how and where the assignment is to be turned in
  • Assignment Notes that offer hints or specific strategies that students can use to better understand what they should be doing
  • a Getting Started section that describes some of the basic steps that students can use to begin their project
  • a section entitled “Questions for you to consider (Not Hand In),” which gives students a few questions to consider if they’d like to extend their thinking regarding this project
  • a Sample Interactions section which shows actual output from a working version of the program, so that they have a better idea of at least one version of a solution to the problem posed

There are seven projects I assign over the course of the semester that get one of these sheets, and it has greatly improved my students ability to complete assignments. Students who need more support find that the sheet gives them solid start-up strategies, while students who want to explore some of the more creative aspects of an assignment are sooner able to get to the point where they can do that.

Before I began distributing these Project Descriptions, I had it in my head that giving students a “Sample Output” listing would somehow be “giving it away.” The reality turned out to be that without a clear indication of my expectations, students didn’t find the project “intriguing” or even “challenging.” It was just “confusing and frustrating.”

Lessons Learned

It’s clear that we all need to revisit our practice from time to time. Conversations with other departments, investigating new technologies, and working with new teachers or even student teachers can all provide insights into what we do, and can provide a jumping off point for conversation that openly consider changing what we do as circumstances warrant.

By incorporating a Responsive Design attitude towards our own teaching–adapting what we do according to new contexts–we become more dynamic and more effective teachers.
P.A.C.E. yourself

P.A.C.E. yourself

by Richard White

2013-02-16

Spend any time on survival or disaster blogs—for the record, I don’t—and you’ll stumble upon the PACE acronym, which describes strategies or plans that you might develop for particularly mission-critical plans.

“PACE” stands for your
* Primary Plan
* Alternate Plan (to be implemented when the Primary fails)
* Contingency Plan (to be implemented if Alternate Plan fails)
* Emergency Plan (for serious uh-oh situations)

I used to work at a school that asked teachers to submit an “Emergency Lesson” plan that presumably could be taught by a substitute teacher called in at the last minute to replace you, in the event that one had an unplanned absence. That’s the right idea, and probably sufficient for the purpose.

Let’s look a a technology example though, familiar to anyone who’s ever had to teach in a room with a flaky Internet connection. You’ve a visiting teacher at a school and you’ve got that perfect YouTube video inserted in a presentation, and it’s go time. You head to the site, and… nothing. YouTube has been blocked at the school.

Not to worry. You’re ready, with multiple strategies for showing that video.

1. Primary Plan – Visit YouTube to show video

2. Alternate Plan – Show local copy of video that you downloaded using KeepVid.com

But that file appears to be corrupted… or maybe you can’t find it, or… well, no matter. You go to

3. Contingency Plan – Use a VNC client to connect to your home computer…

… but it turns out the wireless is down, or perhaps the whole school network! You turn to the last option, which in all likelihood is going to be more trouble than its worth, but dammit, this video is critical!

4. Emergency Plan – You pop out your Verizon iPhone and set up tethering on your machine, connecting to YouTube’s servers via a cell connection.

Now what are the odds that you’re going to have that many failures? Pretty low, and let’s face it, any teacher worth his or her stuff really shouldn’t be relying on YouTube *that* heavily for their lesson. But you get the idea. Really important stuff deserves not just a backup plan, but several layers of backup plans.

Another example. Aaron and I were heading to Monterey to give a talk at a conference, and we’d spent a fair amount of time working on our presentation deck. We wanted to leave nothing to chance, so we headed up with:
1. The presentation on one of our laptops.
2. A backup copy of the presentation on the other’s laptop.
3. A USB drive with a copy of the presentation there.
4. A copy of the presentation on each of our servers where we could pull it down if needed.
5. A PDF copy of the slides on another USB drive that we could scroll through on even a borrowed Linux machine in the unlikely event that everything else went down.

We didn’t need any of those backups, thank goodness, but the fact that we knew we had them gave us a certain peace of mind during our travels.

PACE yourself. Because I’m not really interested in your backup plan.

I want to know what happens when your backup plan *fails*. :)

Back to School Route Map

BACK TO SCHOOL ROUTE MAP
2012-08-21
by Richard White

It’s August, and most of the teachers I know are easing out of the summer vacation and into getting ready for the new school year. If you haven’t busted out your planner (or perhaps you’re using a spreadsheet, or a Google calendar, for your planning?), you’d better get on it. Labor Day is just around the corner!

There’s a whole lot of insanity that happens during the school year, and it seems like we’re often living day-to-day, with the grading, and the writing emails to parents, and the meetings. Often, there just doesn’t seem to be time to step back and take a look at the Big Picture of the school year. There’s a lot to be said for bringing a scrappy, seat-of-your-pants renegade enthusiasm to your work—Middle School teachers practically thrive under those conditions, God bless ’em—but it’s valuable to be able to maintain some sort of overview of things, even in the midst of the trauma of daily life.

Have you considered a route map?

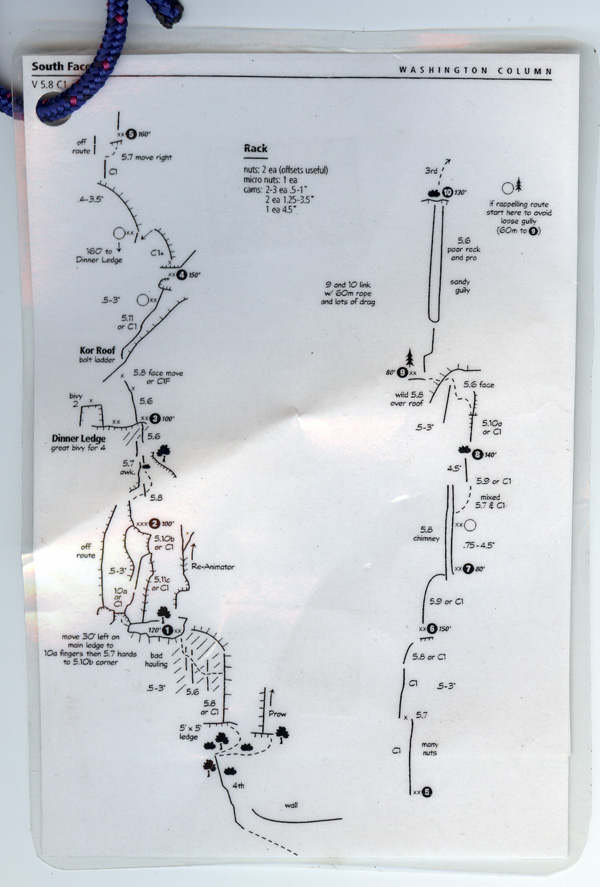
I had the good fortune to do a 3-day rockclimb up the sheer face of Washington Column, a “big wall” that faces Half Dome in Yosemite National Park. This is one of those climbs that you hear about on National Geographic Explorer, with the loads of gear, and the sleeping on hammocks, and cracked lips and blistered fingers. A former student of mine led me up “The Prow,” and it was awesome.

We had a route map for the climb, a copy for each of us, laminated and clipped to our harnesses where we could access it at a moment’s notice. It wasn’t a step-by-step guide or anything. We had 1100 feet of vertical climbing to do, and there was no way the little map could give us enough information—we ascended the rock with shoes and handjams, ropes and camming units—but as a small-scale guide to significant features, landmarks, and ledges, it was invaluable.

Many textbooks provide students with a route map for their course of study. Chapters and sections are where the work gets done, but we all agree that an overview of the year gives students a valuable context into which they can place their learning.

In the same way, having a route map for your school year is a great way to maintain an overview of where you are and where you’re going this school year. A piece of paper with some goals or deadlines or milestones is a nice way of keeping your perspective, even as the day-to-day grind grabs most of your attention.

It doesn’t even have to be a separate document, although that can be a nice way of keeping the route map from getting lost. You can mark milestones on a daily calendar if you like, although again, those items risk getting lost in the large-scale of a daily schedule. Some people use Project Planning software, although that seems to involve levels of infrastructure that fall far beyond the needs of most classroom teachers I know.

Some of the items I include on my own School Year Route Map:
* August – Order lab materials for new school year.
* August – Get course website up and running one week before school starts.
* September – Welcome email to all students and parents, with online grade info
* September – Photos and assignments ready for Back-to-School night.
* November – Write comments for First Quarter grades.
* December – Create/post first semester Extra Credit assignment.
* January – Materials prepped for second semester elective
* January – All grades completed ahead of semester end
* January – Server available for second semester programming class?
* January – Classroom workstations available for second semester programming class.
* January – Meet w/ school director to coordinate second semester field trip

Again, it’s not like any of these are a surprise to me when I sit down to think about it. But the route map keeps me oriented, and reminds me that I need to take care of these items—they will all, at some point or another, find their way onto my daily schedule.

Best wishes for the coming school year!

How to Flip Your Classroom

HOW TO FLIP YOUR CLASSROOM

2012-06-30

by Richard White

Flipping a classroom consists of off-loading (usually to the Internet) some of the non-interactive aspects of one’s classroom, in favor of using time in-class for activities that take advantage of the teacher’s immediate presence.

Perhaps the most obvious example might be this:

At school At home
Standard classroom Student listens to teacher introduce new math topic Student goes home and tries to do homework, often unsuccessfully and without the opportunity to get questions answered in a timely manner.
At home At school
Flipped classroom Student watches brief video explanation of new topic online, or reads new material to be discussed in class the next day. Student works on “homework” problems, with teacher answering questions or providing clarifying follow-up as necessary.

Pretty straightforward, right? It’s a good idea, and there’s lots to recommend it. In fact, you may already be implementing some aspects of the flipped model, even if nobody has ever referred to it by that name before. Some teachers give students time in class to read a chapter in novel, and then discuss it in the remaining class time. Others choose to assign the reading as homework, leaving more time in class for re-reading passages, interpreting what the author has written, or general discussion.

If you’ve done something like this, congratulations—you’re officially part of the most recent trend in education, and you should feel free to strut around saying things like, “‘Inverted learning?’ Honey, I’ve been flipping my class for years…

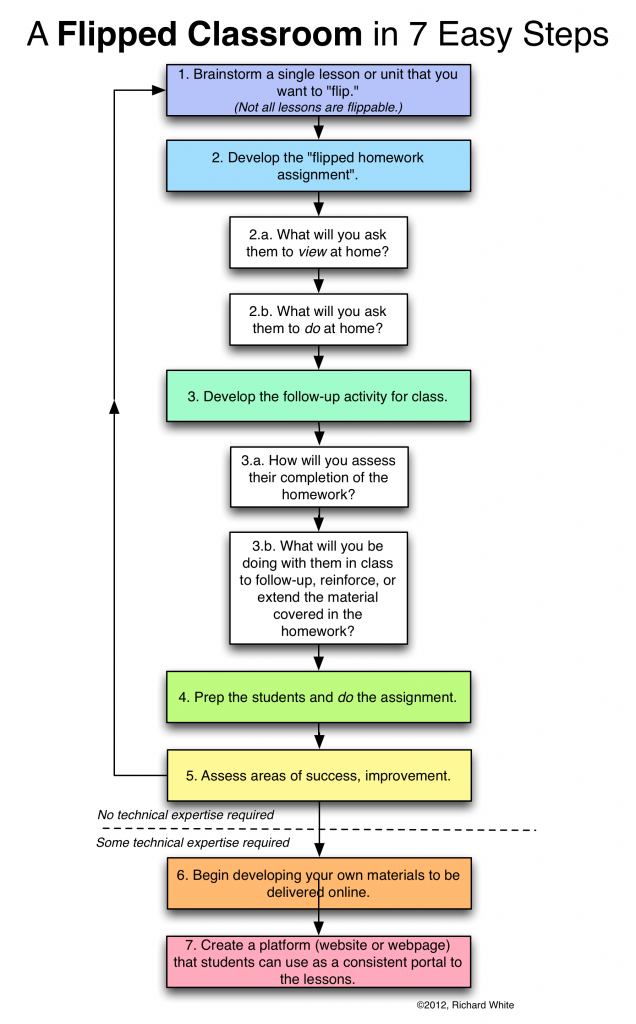
If you haven’t tried this yet, or you’re just looking for a few ideas on how to get started trying this out, let’s take a look at the stops involved in doing such a thing. And then read below for some specific bits of advice regarding the process of converting to a flipped classroom.

Things to think about:

Start with a single day, or a single week, or a single unit.

You don’t need to reorganize your entire semester to begin trying out a flipped model. A day or two will give you a chance to see what the benefits and challenges are, and give you some good ideas on how to go about designing a flipped model on a larger scale.

Be patient with the students.

It may take them a little time to adjust to this at first. Under the traditional model, it’s easy for a teacher to ascertain whether a student has turned in a homework assignment, and easy for students to recognize something tangible like the piece of paper with their writing on it. A flipped instruction model is going to ask them do something rather than make something—watch a video, read this section, interview their parents about something—and this is a little different from what they ordinarily do for homework.

What can you flip in your class?

We all teach different subjects, in different ways, so it’s a uniquely personal challenge, figuring out what you can try flipping in your own class.

Here are some ideas to get you started, following the same format listed above.

The French Revolution

At school At home
Standard classroom Teacher lectures on the the origins of the French Revolution Student goes home and does a worksheet or write answers to problems from a textbook.
At home At school
Flipped classroom Student at home watches a Khan Academy introduction to the French Revolution, and is asked to take notes on that presentation. Student comes in to class with notes prepared for a discussion. Students are asked to take additional notes as the discussion proceeds, and teacher collects notes at the end of class for evaluation.

Adding Fractions

At school At home
Standard classroom Teacher presents the idea of adding fractions with different denominators, and does an example. Student goes home and does homework problems from his or her textbook.
At home At school
Flipped classroom Student at home watches a YouTube video on adding fractions, and is asked to do attempt two different practice problems at home. Student comes in to class with practice problems completed (or not), and instructor gives an additional 15 problems of varying degrees of difficulty to reinforce the skill.

You get the idea.

Think about assessment.

When students walk into class the next morning, how are you going to know whether or not the students have done their flipped-style homework from the night before? A warm-up activity? A quiz? A discussion in which each student is monitored for participation? My own students tend to try to get away with doing less rather than more, so you’ll need to identify a means for checking that they’re doing their new homework.

Allow for varying access to technology.

If students don’t have some sort of comparable access to technology, you’ll need to develop strategies for managing those differences. If a video lesson is being watched online, a teacher might send home a DVD that the student can watch at home. At-school access to the video, in the library perhaps, can be arranged for during other times of the school day. These factors can complicate your efforts to flip the classroom, but it’s important that all students be accommodated in one way or another.

Create your own resources.

Ultimately, there will come a point at which you’ll find that what you need your students to see doesn’t yet exist, or maybe you’ll be inspired to develop something unique and personalized for them. Creating and uploading videos to YouTube is a relatively easy thing to do with the webcam that’s probably already included in your laptop computer. If you want a higher production value, or you want to capture your computer screen while showing a PowerPoint presentation, you’ll almost certainly have to buy some software that will allow you to experiment with that process. TechSmith’s Camtasia for both PC and Mac, and Telestream’s Screenflow for the Mac, are currently popular and powerful screen capture utilities. If you run Linux, you can do a $ sudo apt-get install xvidcap to install XVidCap, a live screen capture utility that’s very good, but lacks some of the high-end editing capabilities built into Camtasia and Screenflow.

Make your materials available on a website.

Google’s YouTube is a powerful means of delivering videos, but it can be a distracting place to send a student for flipped homework assignments. At some point you’ll almost certainly want to create a webpage or website that will give students a one-stop shop for finding materials used in your course. Your school may offer the means of putting up a course webpage, but if not, you can certainly create your own. The quickest, easiest, and certainly cheapest way to do this is to use Google’s Sites feature, available with any Google account. Once you’ve got your page set up, you can use it to easily deliver flipped assignments to your students.

When you look at all of that up there, it seems like it’s a lot of work, but you certainly don’t have to jump into this all at once. Begin at the beginning, and move forward as your time and teaching assignment allow.

For more resources on Flipped Classrooms, see:

Five Things To Do at the End of the School Year

FIVE THINGS TO DO AT THE END OF THE SCHOOL YEAR

2012-06-15

by Richard White

It’s the end of the school year, and maybe you’ve had a chance to close things out in your classroom. How about taking a few moments to close things out on your computer, too?

Here are six things to do with your computer at the end of the school year.

1. Backup Everything
This should go without saying, but I’m always amazed at how many people don’t have a backup of their computer. If you don’t already have at least two local backups of your Documents folder, and if you don’t already have a subscription to an offsite backup solution like Backblaze or Carbonite, you’ll be pleased to know that you are excused from the rest of this assignment. YOUR assignment is to:
a. order one of these or something similar with 2-day shipping from Amazon, and then set up your computer to do automatic backups (Time Machine on the Mac, Backup and Restore on Windows 7).
b. While you’re waiting for your hard drive to arrive, you can go to Backblaze or Carbonite, give them $50-$60 on your credit card, and sign up for a year’s worth of offsite, in-the-cloud, backups. Because… your computer is going to crash. If it’s happened to you already, you know what I’m saying, and if it hasn’t happened to you yet, don’t worry: it will…!

2. Archive Last Year’s Material
With any luck at all, you’ve already got someplace in your Documents folder where you’ve saved all the work you’ve done this year: those tests you wrote, those handouts and worksheets you created, etc. Those should all be dragged into a folder called “AcademicYear2011-2012” or something similar. And if those documents are scattered willy-nilly about your desktop, that’s all the more reason to take advantage of this opportunity to assemble them all in one place.

(The reason for this is two-fold. You want to reduce the amount of time and energy you waste digging through old documents that aren’t actively being used, and you want to reduce the amount of time and energy you spend looking for those documents when you do need to find them.)

You get extra credit for organizing the files from this academic school year into sub-directories labelled by class.

3. Archive your email
If you’re like many teachers I know, you have a drastic drop-off in the amount of work-related email you get during the summer. Now’s the perfect time to tidy up that Inbox. Archiving or exporting email, depending on which email process you use and what facilities there are for archiving, may make your Inbox faster loading and easier to navigate.

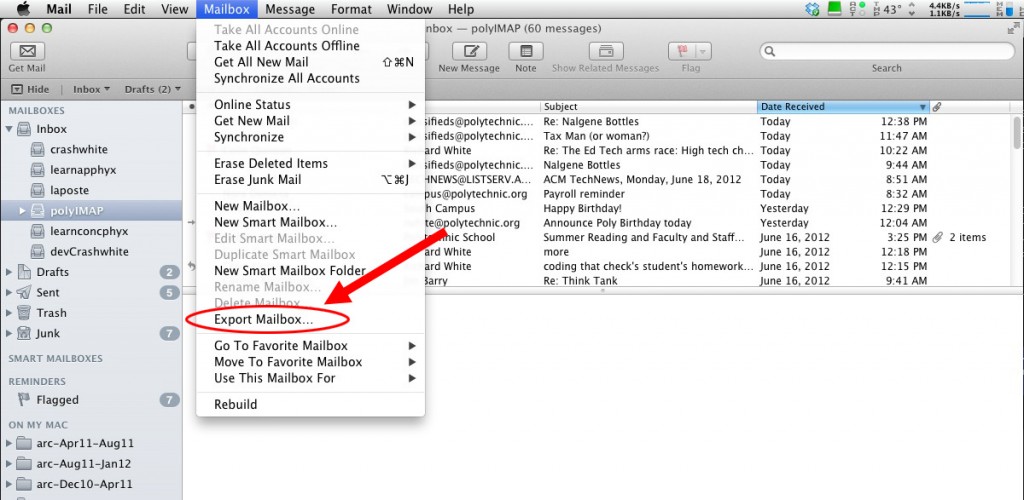
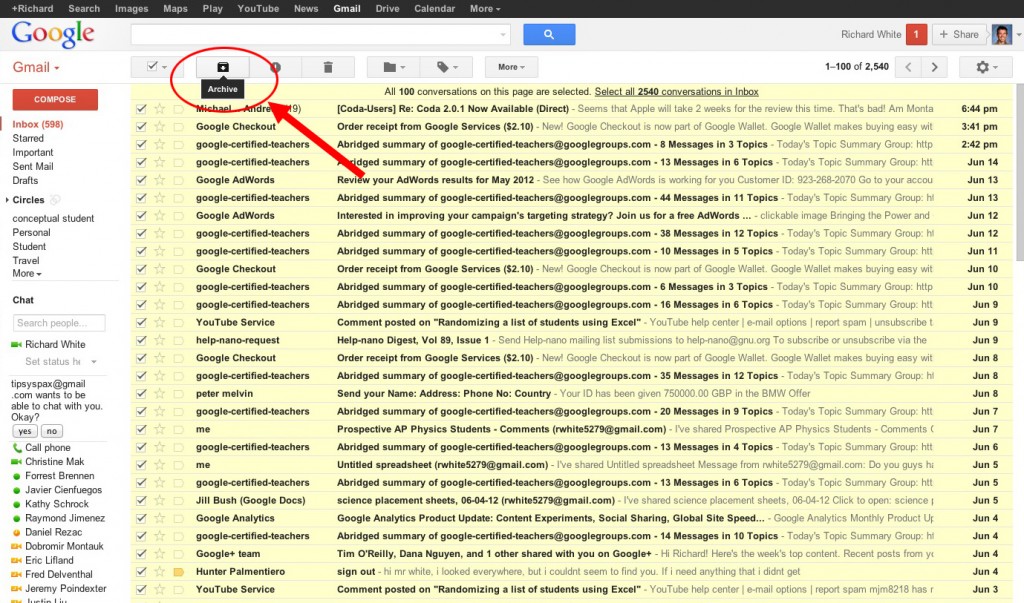
There are numerous strategies for doing this. Google’s web-based Gmail and Apple’s Mail.app both offer convenient commands for doing this right from the interface (see screen captures below). Consult the documentation for those services, or check in with your local IT staff for specific advice on how to export or archive your own email.

4. Digitize Your Stuff
If you’re still carrying around paper copies of your class materials, the end of the school year is a perfect time to digitize. Anything that’s a Word document or a PDF is easily stored in the appropriate folder on your computer. Anything that’s NOT, and that you need to keep for future reference, can be scanned as a PDF and tucked away into a folder on your computer, where it will be (in most cases) far easier to find, and take up far less space (like, *none*) in your filing cabinet.

5. Get Organized
Everybody loves a little Spring Cleaning, and the chance to clear out the detritus that naturally accumulates over time. (You have heard of the Second Law of Thermodynamics, haven’t you?)

There’s a note I keep on my computer to remind myself of the benefits of keeping organized. It’s from a talk on What We Know About Learning given by a professor at Caltech last year, and it simply says, “Simple frameworks reduce cognitive load.” The idea is that creating a framework or structure that you can use to organize your understanding makes it easier to learn, and I’m obviously extending that idea to the hard drive on your computer. Get things organized on your hard drive, and it will be easier for you to access and work with that information.

Here’s the directory structure of a folder on my hard drive called “edu,” into which I’ve placed a number of different folders for various educational contexts. The “poly11-12” folder contains sub-folders of the files I’ve used this year in my courses and other contexts at school. I leave those files and folders there as a record of what I did that year. If I need a copy of a file for the new school year, I do just that: I make a copy for the new year, and leave the original in place.

An Introduction to Dropbox

AN INTRODUCTION TO DROPBOX

by Richard White

2012-06-11

Have you heard of Dropbox? Are you using it yet? If the answer to either of these questions is ‘no,’ then sit back and prepare to be freaked out. In ten minutes or so, Dropbox is going to change your entire world.

Dropbox is, at its simplest, an online directory (folder) where you can store files. It looks like a folder on your computer, but everything in that folder is also stored “in the cloud,” on Dropbox’s servers.

Why would you want to store your stuff on their servers instead of on your own computer? Two common use-cases will demonstrate.

  • You want to share files with another person.
    Have you ever tried to email a 50MB movie to someone, or wanted to send them a set of photos from your vacation? Email doesn’t let you do it because the file sizes are too small. But you can place those files in a Dropbox public folder, or created a Dropbox shared folder, and your friend can use Dropbox to access those files. Problem solved.
  • You want to share files with yourself on another device.
    I have a few files that I need to have access to from multiple machines. With Dropbox installed on my Mac, on my Windows machine, on my Ubuntu Linux machine, and even on my iPhone and iPad, I can work with those files without having to email them to myself or go through any of those other machinations. Any changes I make to the file on one machine are automatically synced nearly immediately to all devices.

The nitty-gritty details: Dropbox is free for the first 2GB of storage. If you want more than that you’ll have to pay, or have people sign-up for Dropbox using a link you provide in which case they’ll award you a little referral love by increasing that amount for each person bring in. You do have to download their software to install on your machine—this is not a browser-based program. You’ll need network access, obviously, if you want files to be synced between machines. You can access local copies of the files on most devices, although mobile devices (iPads and iPhones) don’t keep local copies (unless configured to).

Dropbox states that files are stored securely, and maybe you’re satisfied with that. The truly paranoid, or those with files of a particularly sensitive nature, will almost certainly encrypt their files or folders before uploading them.

One other caveat: if you share a directory with someone else and they decide to alter or delete a file in that folder, then it obviously gets altered/deleted from that Dropbox folder, which means that your copy—perhaps your only copy of that file—also gets altered/deleted. Thus, it may be in your interest to keep an archive copy of whatever files it is that you’re sharing with others—those business documents, those vacation photos, etc.

Cleaning Up Your Desk(top)

CLEANING UP YOUR DESK(TOP)

2012-05-17

by Richard White

I’m a physics teacher, so I totally get that whole entropy thing.

You know. The Second Law of Thermodynamics?

No?

The general idea is that the universe is getting increasingly disorganized, always. An chicken egg, which starts out pretty organized (shell on the outside, yolk and albumen and stuff on the inside) gets broken, and can never get put back together again. A teenager’s bedroom gets cleaned at some point, and in a shockingly short period of time turns into complete and utter disarray.

Yes, that Second Law of Thermodynamics.

The desktop on your computer, which is currently showing dozens of little files on it if you’re like everyone else, is in some disarray, and needs some cleaning. You should organize those files, and tuck them into some little folders somewhere in your Documents folder. It won’t take long, and you’ll thank me for it later.

“Why?” you ask—”I’ve survived just fine up to this point, and besides, I know where everything is.”

Well, that may be. And I don’t ordinarily like to preach that whole “my way or the highway” thing, but… look, you wouldn’t invite me over to your house until you had a chance to straighten things up a bit, right? Because living in squalor is nobody’s idea of “pretty.” The grubby state of your house tends to reflect a certain carelessness on your part, and perhaps even a health risk, depending on how long it’s been since you washed those dishes. It may even be hard to find things, and you end up wandering about a bit, looking for where you put the keys, or that can of soda, or that bill that needed to be paid.

In that same way, the desktop on your computer—and yes, I’m preaching now—reflects your approach to managing your digital life. You need to clean up your desktop once in awhile. Get those files that you’ve saved there organized into a folder or three, or tuck them away into the appropriate folder in your Documents. If you’ve got 5-10 folders sitting there on the desktop right now and you’re sort of using them, that’s alright. Don’t freak out about it. But if you haven’t looked at that document in a week or three, put it away some place, because on your desktop, it’s just cluttering things up.

“What do you care?” you ask. Good. I don’t! I don’t care about your desktop as long as I don’t have to help you fix your computer. But if I need to sit down and figure out what’s going on with your broken machine, I don’t want to look at your messy house. I’ll probably need to clear some space there, too, so I can download some system updates, install new software, etc. I’ll probably also be trying to clean your disk up a bit, and that’s harder for me to do if you have boatloads of random crap lying around on your hard drive.

Most importantly, though, (cue disapproving Dad tone of voice here)… If you won’t do it for me, do it for yourself. Developing an organized approach to managing and storing the files on your computer will make it much easier for you to find things when you need them. It’ll improve the efficiency of your workflow.

It’ll make you a better person.

Go clean your room Desktop.

Email Etiquette @ Work

Email Etiquette @ Work

2012-03-28

by Richard White

You know, every few months it seems I read another article about “the death of email.” It’s being replaced by chatting (online). It’s being replaced by texting (on phones). It’s being replaced by always-on social networking sites, mostly Facebook, or maybe Twitter.

It’s true that email doesn’t have the same luster that it once had, but it’s still the backbone of Internet-based communication, if only because all those fancy networking sites, still rely on email to validate your membership.

In the workplace, though, email is still king, despite the fact that it gets horribly misused by so many.

All that’s about to change, though.

Here are four simple things you can do to make email better for you and those you love (your coworkers). This won’t fix everything, but it’s a damn good start.

  1. Please don’t give me a paper copy of that letter, or that document, or that report. I don’t need a paper version, or if I do, I’ll print one. What I really need is an an electronic copy of the file. Email it to me. Thanks.
  2. When you attach that file to the email… don’t forget to attach it. If you DO forget to attach it, just send a quick follow-up email with the same Subject as before, and and the body with the document attached. That way I’ll be easily able to find the follow-up email.
  3. For work emails, use clear, succinct subject lines that inform the recipient of the contents. Subject lines like “Great news!” or “We need to talk” are useless. Instead, use “Update in History Curriculum” or “Meet with you on Thursday?”
  4. Reply at the top of an email, not at the bottom. Don’t force readers to scroll all the way to the bottom of an email to find what you wrote. Your message is important, and should be placed at the top of the reply where it can be quickly and easily found. (If you find this preference abhorrent, I’d urge you to consider the fact that Google’s GMail and Apple’s Mail.app implement top-replying by default, and don’t even offer an option for bottom-replies.)

What other possibilities are there for improving email in the workplace? Love it or hate it, managing your email and your emailing habits is a part of modern life.

Embrace the email!

My Go Bag


My Go Bag
2011-12-13
by Richard White

A “Go Bag” is that bag you keep by the door, and grab on the way out in case of emergency, disaster, etc. Spies might keep weapons and a passport for a new identity in their Go Bag, a pregnant woman might keep a change of clothes and a flashlight in her Go Bag… you get the idea. Some urban “warriors” (commuters, really), looking to pump up their street cred, have adopted the Go Bag term for their own use, and use it to refer to any daypack or shoulder bag that contains essential items for a day in the wild: in the car, on the bus, at work.

So what’s in your Go Bag? What do you find essential for your day in the classroom, as a teacher, as a technologist?

People tend to fall into two camps in this matter: some adopt a “everything but the kitchen sink” attitude with an eye towards hauling around everything from multiple power supplies, screwdriver sets, and water purification tablets—because you never know when you might need to purify some water, right?—and others go for the fast-and-light approach, carrying a minimum of gear and hoping that any unplanned for emergencies will be resolved by relying on the kindness of strangers.

Me, I tend to go fast-and-light.

I think it started when I was preparing to move to France for an extended period of time. I would only be carrying a single bag for the trip, so space was at a premium, and I made some difficult decisions about what to carry. Since then, I’ve embraced carrying a minimum of gear in my travels, including my commute to and from work.

So without further ado, here’s my list, with comments. Trust me, this is going to take long.

  1. Daypack
    My personal favorite right now is a Mountain Tools Stealth pack, 21.3 Liters worth of black ballistic cloth badness. It’s a simple, one-compartment, zip-open number, and so slim it’ll make you wonder how you’re going to fit all your stuff into it. Surprise answer: you can’t. You’ll have to pare down your essentials a bit, eh?
  2. Wallet bag
    I have a very thin wallet—just driver’s license, credit card, ATM card, and health care info—but even so I don’t ordinarily carry it in my jeans. I keep the wallet in a zippered pouch that also holds a ballpoint pen, and contacts solution. The pouch just keeps these other items from rattling around too much in the pack.
  3. Sunglasses
  4. Laptop
    Of course. The 15″ MacBook Pro that I use for just about everything slips into a snug Waterfield Designs Laptop Sleeve Case (sfbags.com), which itself slips nicely into the pack.
  5. Cellphone
    It’s often in my pocket, but sometimes it’ll be in here.
  6. Keys
    Clipped to a carabiner attached to the top of the pack.
  7. Papers
    The day’s paperwork is nicely contained and protected by a thin plastic folder.

That’s it.

Seriously.

What more do you need?

Okay, okay, the bag’s not full yet, and maybe the weather’s looking a little shaky for the next couple of days. You can add:

  1. Umbrella
    … and/or a light sweater or jacket
  2. Power brick
    for laptop
  3. USB cable
    to charge the phone with the laptop.
  4. PowerBar?
  5. Swiss army knife?
  6. Bottle of water?

Yeah, sure you can bring all those things. Just don’t start getting carried away, right? Fast-and-light is the way to go.

“What do you have in your backpack?”
– Ryan Bingham in “Up in the Air”

Pick Your Poison: Working with Words on the Computer

PICK YOUR POISON: Working with Words on the Computer

2011-09-23

by Richard White

When it comes time to sit down and compose a text-based document, what’s your weapon of choice? Microsoft Word? Google Docs? Window’s Notepad or OS X’s TextEdit? emacs? vim?

Most people have a favorite tool that they use to write with, and in a recent Thinking Stick blog post, Jeff Utecht gives 10 Reasons to Trash [Microsoft’s] Word for Google Docs.” He brings up some excellent points, which are explained in further detail in the post:

  1. No more corrupt files
    A Word file that works on a student’s computer may not work on someone else’s.
  2. No more corrupt USB Keys [“thumb drives”]
    USB flash drives can become lost or corrupted.
  3. .doc .docx who cares!
    Something of a repeat of #1.
  4. Work Collaboratively
    Students can share Google Docs with each other.
  5. Share and Share a Like (sic)
    Something of a repeat of #4.
  6. Export to PDF or Word no problem
    Google Docs can be exported to these formats.
  7. Make it Public
    Google Docs can be published as a webpage for viewing by anyone.
  8. Work from any computer with Internet access
    Google Docs can be easily viewed/edited by you even if you don’t have access to your own computer.
  9. Work on the Go
    Google’s Chrome browser offers some limited ability to work on your Google Docs offline.
  10. Because it’s the future
    “We’re headed into a fully web-based world.”

Jeff does a good job pointing out some of the strengths of Google Docs, especially for high school students which is who this post is targeted towards. And it’s true that Microsoft’s Word is not everyone’s cup of tea. It’s a large, relatively expensive program with an awful interface and a boatload of features that go unused by most users.

But Word is also the de facto industry standard for creating word processed documents. Period. Anyone who is interested in sharing word processing files pretty much has to have Word in their arsenal, and I think that reasoning extends to high school students, or at least those who are able to have access to that software.

Google Docs has plenty to recommend it, and Jeff hits on some of its strengths. Its a great way of developing a shared document with someone, with the ability for two users to work simultaneously on the same file. Documents are auto-saved, and being able to access one’s work from any machine connected to the Internet can be awfully handy. In addition, Docs is free. I use Google Docs on a regular basis for some of my projects, particularly on those in which I am collaborating with someone else.

The bad news is that Google Docs isn’t quite ready for prime time for anything more than the simplest document. The challenges faced (as of 9/24/2011) by this web application fall into two categories:

  1. No offline editing of documents–you MUST have an Internet connection if you wish to work on your Google Doc.
  2. Incomplete feature set (depending on your needs), including
    1. Single style of bullets
    2. Fewer than 20 fonts available.
    3. the equation editor is a good start, but can’t express equations like

    4. etc. (there are others)

Google Docs is excellent at what it does, primarily allowing users to maintain documents “in the cloud” and sharing them with other people. But to suggest that it has become a viable alternative to the many-featured Word is jumping the gun, I think, unless you simply don’t need the features that Word provides.

And if that’s the case, Google Docs will serve you well… or perhaps you can get away with using an even simpler and more robust document creation tool: the humble text editor.

We’ve touched upon this in the past so we don’t need to belabor the point here, but a text editor allows one to write unformatted, ‘plain text’ documents without worrying about nonsense like bullets, margins, bold or italic fonts, etc. (I’m using a text editor to write this post, actually.) At some point in the future, if that plain text needs to be formatted, it’s easy to do so: copy-paste the plain text into your Word or Google Docs document, select (highlight) the text you want to format, and apply formatting from Word or Google Docs as required. Easy.

Working with a plain text file has some of the same advantages that Jeff mentions in his list above.

  1. No more corrupt files
    A text file is a text file. All computers can read them.
  2. No more corrupt USB Keys [“thumb drives”]
    That’s true if you keep your plain text files on a server, which is perfectly possible. (I’m using DropBox and the excellent PlainText app to allow me to work on my plaintext files from multiple locations.)
  3. .doc .docx who cares!
    These extensions indicate Word files. Most people use “.txt” to indicate a plain text file.
  4. Export to Google Docs or Word no problem
    Via copy-paste, plain text files can be dropped in to other documents easily.
  5. Work from any computer with Internet access
    Plain text files stored on a server can be accessed in this way.
  6. Work on the Go
    A local copy of your plain text file can easily be synched with the server later on.

In addition to these benefits, you may discover others:

  1. Plaintext improves your writing
    By allowing you to focus on the words themselves rather than what the words will look like, writing in plaintext improves your writing. Don’t get stuck on the style of your heading, or whether you should italicize a word or not. Just WRITE. You can worry about making it pretty later on!
  2. Start writing faster
    You don’t need to wait 3 minutes for Word to load up or to log on to Google Docs. Open your text editor and start writing.
  3. Smaller file sizes
    Text files are orders of magnitude smaller than the bloated files created by Word—text files don’t have to contain all that formatting information, right?
  4. Improve your Geek Credibility
    The lowly text editor is not the sexiest product out there—after all, Notepad (Windows) and TextEdit (OS X) are provided for free with the operating system. But they’re one of the most powerful tools in the geek’s toolbox. Just ask coder Gina Trapani, Google Director of Research Peter Norvig, author Neal Stephenson, and LifeHacker Kevin Purdy.