More videos, in support of Poly’s new Bring Your Own Device program for 9th graders this year.
Category Archives: Computers
The Intersection of Teaching, Learning, and Technology
The Intersection of Teaching, Learning, and Technology
by Richard White
2013-05-23
When I was nine years old I read Danny Dunn and the Homework Machine, a story in which Danny and his friends Joe and Irene program a computer to do their homework for them. At that time the personal computer was still a fantasy, but the possibility of being able to have a machine handle my academic chores–my learning–was absolutely intoxicating.
Fast-forward a few years: I’d gone from programming a mainframe in high school to majoring in Computer Science in college, and then from teaching computer programming in high school on IBM PCs (pre-Internet!) to teaching AP Physics in Berkeley. I’d re-discovered the book from my childhood–there’s my name on the inside, written in my mother’s neat cursive–and read again about Danny’s hard-earned lesson: that programming a computer is not a shortcut to learning. The last page of the book, though, opens up a new possibility:
“Danny had a strange, wild look in his eyes, and a faraway smile on his lips. ‘Listen–what about a teaching machine…?'”
I began investigating the possibilities of technology-enhanced programmed instruction. The learning process for an inspired student can be a pretty straightforward process: get exposed to something new, learn a little bit about it, and then use what you’ve learned to do something interesting. For some subjects, the process of presenting information and checking for understanding is ideally suited for a computer, and I wasn’t the only one who thought so. Programmed instruction in book form had existed for years, and computer-based math instructional methods were already being launched.
I was a month or so into developing my own programmed instruction when I began to realize that this system, whatever its benefits might be, also had the effect of isolating me from the very best part of my vocation: working with students to help them understand the world around them. Teaching content, exploring with students the process of interpreting content, and perhaps most importantly, learning to develop strategies for dealing with new and unexpected situations, all demand a dynamic, creative, process that is the very heart and soul of my work. There was no way for me to write this stuff down, to program it, to “classroom flip” this aspect of my work.
That hasn’t kept me from leveraging technology where appropriate. The vast majority of my current curricular materials are online–lessons, labs, homework help, and practice tests–and students across the U.S. and abroad use these materials as a guide in their own learning. I am part of a global learning and teaching community, using technology that is faster, cheaper, and better than ever. We are actively exploring new ways that we can use that technology to improve education.
But at the heart of it all–sometimes just barely visible behind the iPads and the laptops, the email and the tweets, the websites and the Massive Open Online Courses–are students and teachers, working together, just as we always have.
And there is nothing that will be able to replace that.
Five Things To Do at the End of the School Year
FIVE THINGS TO DO AT THE END OF THE SCHOOL YEAR
2012-06-15
by Richard White
It’s the end of the school year, and maybe you’ve had a chance to close things out in your classroom. How about taking a few moments to close things out on your computer, too?
Here are six things to do with your computer at the end of the school year.
1. Backup Everything
This should go without saying, but I’m always amazed at how many people don’t have a backup of their computer. If you don’t already have at least two local backups of your Documents folder, and if you don’t already have a subscription to an offsite backup solution like Backblaze or Carbonite, you’ll be pleased to know that you are excused from the rest of this assignment. YOUR assignment is to:
a. order one of these or something similar with 2-day shipping from Amazon, and then set up your computer to do automatic backups (Time Machine on the Mac, Backup and Restore on Windows 7).
b. While you’re waiting for your hard drive to arrive, you can go to Backblaze or Carbonite, give them $50-$60 on your credit card, and sign up for a year’s worth of offsite, in-the-cloud, backups. Because… your computer is going to crash. If it’s happened to you already, you know what I’m saying, and if it hasn’t happened to you yet, don’t worry: it will…!
2. Archive Last Year’s Material
With any luck at all, you’ve already got someplace in your Documents folder where you’ve saved all the work you’ve done this year: those tests you wrote, those handouts and worksheets you created, etc. Those should all be dragged into a folder called “AcademicYear2011-2012” or something similar. And if those documents are scattered willy-nilly about your desktop, that’s all the more reason to take advantage of this opportunity to assemble them all in one place.
(The reason for this is two-fold. You want to reduce the amount of time and energy you waste digging through old documents that aren’t actively being used, and you want to reduce the amount of time and energy you spend looking for those documents when you do need to find them.)
You get extra credit for organizing the files from this academic school year into sub-directories labelled by class.
3. Archive your email
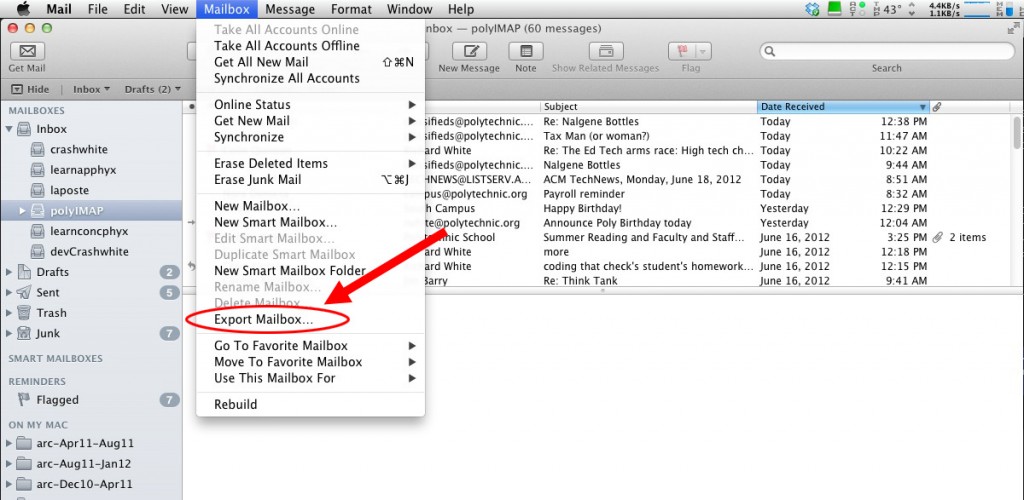
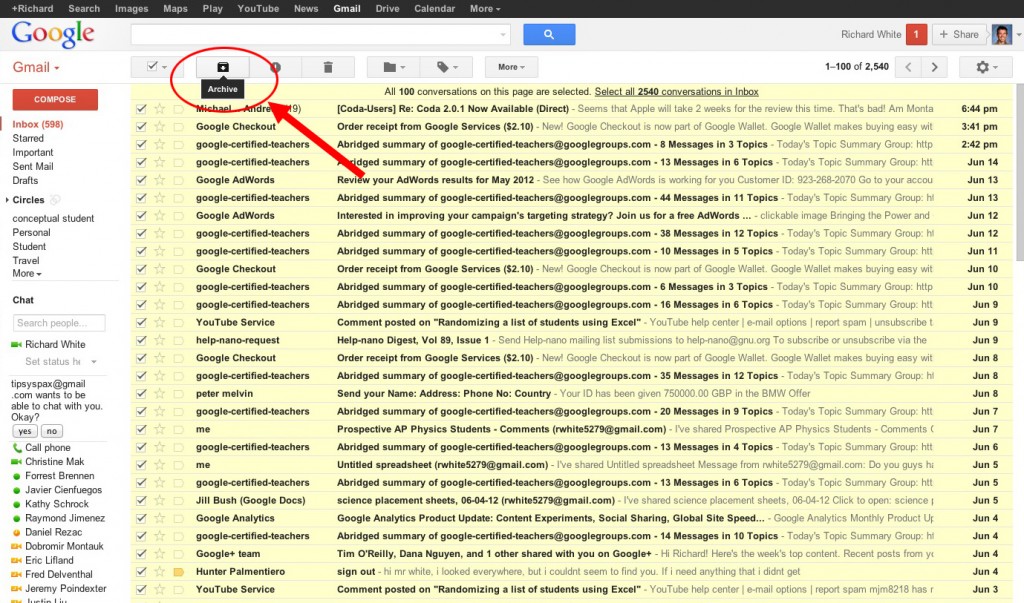
If you’re like many teachers I know, you have a drastic drop-off in the amount of work-related email you get during the summer. Now’s the perfect time to tidy up that Inbox. Archiving or exporting email, depending on which email process you use and what facilities there are for archiving, may make your Inbox faster loading and easier to navigate.
There are numerous strategies for doing this. Google’s web-based Gmail and Apple’s Mail.app both offer convenient commands for doing this right from the interface (see screen captures below). Consult the documentation for those services, or check in with your local IT staff for specific advice on how to export or archive your own email.
4. Digitize Your Stuff
If you’re still carrying around paper copies of your class materials, the end of the school year is a perfect time to digitize. Anything that’s a Word document or a PDF is easily stored in the appropriate folder on your computer. Anything that’s NOT, and that you need to keep for future reference, can be scanned as a PDF and tucked away into a folder on your computer, where it will be (in most cases) far easier to find, and take up far less space (like, *none*) in your filing cabinet.
5. Get Organized
Everybody loves a little Spring Cleaning, and the chance to clear out the detritus that naturally accumulates over time. (You have heard of the Second Law of Thermodynamics, haven’t you?)
There’s a note I keep on my computer to remind myself of the benefits of keeping organized. It’s from a talk on What We Know About Learning given by a professor at Caltech last year, and it simply says, “Simple frameworks reduce cognitive load.” The idea is that creating a framework or structure that you can use to organize your understanding makes it easier to learn, and I’m obviously extending that idea to the hard drive on your computer. Get things organized on your hard drive, and it will be easier for you to access and work with that information.
Here’s the directory structure of a folder on my hard drive called “edu,” into which I’ve placed a number of different folders for various educational contexts. The “poly11-12” folder contains sub-folders of the files I’ve used this year in my courses and other contexts at school. I leave those files and folders there as a record of what I did that year. If I need a copy of a file for the new school year, I do just that: I make a copy for the new year, and leave the original in place.
⌘
An Introduction to Dropbox
AN INTRODUCTION TO DROPBOX
by Richard White
2012-06-11
Have you heard of Dropbox? Are you using it yet? If the answer to either of these questions is ‘no,’ then sit back and prepare to be freaked out. In ten minutes or so, Dropbox is going to change your entire world.
Dropbox is, at its simplest, an online directory (folder) where you can store files. It looks like a folder on your computer, but everything in that folder is also stored “in the cloud,” on Dropbox’s servers.
Why would you want to store your stuff on their servers instead of on your own computer? Two common use-cases will demonstrate.
- You want to share files with another person.
Have you ever tried to email a 50MB movie to someone, or wanted to send them a set of photos from your vacation? Email doesn’t let you do it because the file sizes are too small. But you can place those files in a Dropbox public folder, or created a Dropbox shared folder, and your friend can use Dropbox to access those files. Problem solved. - You want to share files with yourself on another device.
I have a few files that I need to have access to from multiple machines. With Dropbox installed on my Mac, on my Windows machine, on my Ubuntu Linux machine, and even on my iPhone and iPad, I can work with those files without having to email them to myself or go through any of those other machinations. Any changes I make to the file on one machine are automatically synced nearly immediately to all devices.
The nitty-gritty details: Dropbox is free for the first 2GB of storage. If you want more than that you’ll have to pay, or have people sign-up for Dropbox using a link you provide in which case they’ll award you a little referral love by increasing that amount for each person bring in. You do have to download their software to install on your machine—this is not a browser-based program. You’ll need network access, obviously, if you want files to be synced between machines. You can access local copies of the files on most devices, although mobile devices (iPads and iPhones) don’t keep local copies (unless configured to).
Dropbox states that files are stored securely, and maybe you’re satisfied with that. The truly paranoid, or those with files of a particularly sensitive nature, will almost certainly encrypt their files or folders before uploading them.
One other caveat: if you share a directory with someone else and they decide to alter or delete a file in that folder, then it obviously gets altered/deleted from that Dropbox folder, which means that your copy—perhaps your only copy of that file—also gets altered/deleted. Thus, it may be in your interest to keep an archive copy of whatever files it is that you’re sharing with others—those business documents, those vacation photos, etc.
Celebrity Smackdown: iPad vs. Laptop
Celebrity Smackdown: iPad vs. Laptop
2012-05-29
by Richard White
It’s a simple question, really. You’re a forward-thinking guy or gal, and you’re thinking about updating the hardware at your school, or perhaps even getting into a 1-to-1 program, or a Bring Your Down Device agreement with your student body.
What do you do: go with iPads, or laptops?
Before we break this down, let me give you my qualifications, in case you were worried. I have a tendency to favor Apple-based solutions for many situations, both for the high-build quality of their hardware and the relative stability, reliability, and ease-of-use of their software. I have a MacBook Pro that I run OS X on, although I’ve also run Windows 7 on that machine as well. I have a PC desktop at home running Ubuntu, and a Lenovo netbook (x100e, no CD/DVD drive) that I run Windows 7 and Ubuntu on. My cellphone is an iPhone 4, and I waited in line for the original iPad, and purchased the “iPad 3” when it came out.
Another point of reference: I work at a school that officially supports both Microsoft Windows and Apple OS X machines. That same school currently uses classroom carts of machines–PCs, Macs, and iPads–to give students access to computers on an as-needed basis.
I’ve been accused of being an Apple fan-boy, and am somewhat guilty as charged. But what about this iPad vs. laptops showdown? If you only had one device to buy, which would it be?
| iPad | laptop/netbook | |
| Time to wake from sleep | ~ 1 second | 3-10 seconds |
| Battery life | ~ 10 hours | 1 – 4 hours |
| Availability of applications | Many, most modified to run on the iPad. Available only through iTunes. | Many, with availability of certain titles dependent on operating system |
| Interface usability | Touch interface, not suitable for extended typing. External keyboards available. | Keyboard and trackpad, with usability dependent on keyboard size, manufacturer. |
| File management | No access to file system. Apps may have some ability to share files, but third-party solutions (Dropbox, Air Sharing, etc.) necessary to move files around. | Organizing and moving files done with operating system. |
| Cost | Base model: $499 | Varies depending on manufacturer, model. (Lenovo G570, 15.6″ screen, i5 processor, 8G RAM, 750G HDD, Windows 7 Home Premium = $569 sale price) |
| Security | Applications heavily policed by Apple, Inc and sandboxed. No user access to filesystem. | OS X relatively safe, Windows typically requires running anti-virus software. |
| Strengths | Near instantaneous wake from sleep and outstanding battery life. Listening to music, surfing the Internet, reading PDFs, are all dead easy straight out of the box. | Does everything, conforms to current paradigm of computing. Easily customizable. Runs Flash and Java applications. |
| Weaknesses | No “real” keyboard. Programs limited in availability (Microsoft Office suite not currently available) or function (Photoshop Touch doesn’t have full feature set). Doesn’t allow access to file system. Can’t display Flash files or run Java applications. | Relatively limited battery life. Use requires knowing how to navigate the operating system, manage files. |
Does that clear things up? At my school, for some teachers the iPads have literally transformed the way they conduct their classes, with students reading course handouts on them, writing papers on them, uploading them to the instructor via Dropbox, and the instructor annotating their work and returning it to them via email.
For other teachers, the iPad is a non-starter. The Physics classes are unable to run Java-based animations, and the programming class is unable to launch a Terminal or write Python programs.
My recommendation for teachers is that use cases be examined very carefully. For all the talk of a “post-PC world” with “cloud-based storage,” we’re not there yet. As an educator who, in addition to teaching subject-area content is also helping students master the technological tools that they’ll use in college and in business, I strongly feel that there’s so much more to technology than pointing and tapping. Students who are unable to right-click, or “Save As…”, or create a new folder for organizing their files, haven’t been well served.
iPads satisfy some needs for some teachers, it’s clear, and may be part of the educational technology equation for some schools. For an institution with limited resources, however, money will be better spent on laptops. And for schools considering a “one device to one child” program, committing to the iPad–the device du jour–is, in my opinion, short-sighted.
The End is Nigh
The End is Nigh
2011-12-01
by Richard White
“The End is Nigh!” For your optical drive, that is.
CDs and DVDs are still here for the moment, but not for long. Depending on how much you love your archives and content, it may be time to start thinking about a migration process that will allow you to convert your CDs and DVDs to a hard drive.
It’s an easy, if tedious, process. I did it with my documents and data last year: buy a couple of 1-terabyte external hard drives, plug one of them into your computer, plug in the nearly endless succession of CDs and DVDs that you’ve been burning data on all these years, and click-drag over to the terabyte archive.
Once you’ve spent a day or two doing that, plug in both terabyte drives and click-drag all the contents from one drive to the other, which will act as a backup of the archive.
At that point you’ll have at least three copies of your data: the original CD or DVD (which you might want to tuck away, should something catastrophic happen to both hard drives), and two copies of your data on the Archive and Backup external drives.
There are fancier ways to do this that you may already have built. rsync works magic in a shell script, and you can spend hours and days developing a system there that you can use to manage it all.
In the absence of anything fancy, though, at least get your data off those optical drives. In another three years or so, many computers—and certainly the most popular ones, including iPads and Macbook Airs—won’t have an optical drive, and you’ll have easy way to access that data. Let’s face it, the data storage on CDs and DVDs is time-sensitive anyway. Like that old slide film that your father shot just thirty years ago, that medium decays with age. If you think that Apple is wrong about that, you don’t have to look too far back to find another decision they made regarding media that was very controversial at the time. The 1998 iMac G3 came without a floppy disk slot in anticipation of what would happen throughout the industry in the years to come. By 2003, Dell was no longer including floppy disk drives as standard on their machines, and by 2007, only 2% of computers sold included floppy drives.
So, yeah. I’m not saying you need to run out right now and take care of this. But you might want to put it on your ToDo.txt list. I mean, come on. When’s the last time you bought a music CD?
Yup. That’s what I thought.
Do yourself a favor and get a couple of 1-terabyte archive drives. You’ll be glad you did.
Pick Your Poison: Working with Words on the Computer
PICK YOUR POISON: Working with Words on the Computer
2011-09-23
by Richard White
When it comes time to sit down and compose a text-based document, what’s your weapon of choice? Microsoft Word? Google Docs? Window’s Notepad or OS X’s TextEdit? emacs? vim?
Most people have a favorite tool that they use to write with, and in a recent Thinking Stick blog post, Jeff Utecht gives 10 Reasons to Trash [Microsoft’s] Word for Google Docs.” He brings up some excellent points, which are explained in further detail in the post:
- No more corrupt files
A Word file that works on a student’s computer may not work on someone else’s. - No more corrupt USB Keys [“thumb drives”]
USB flash drives can become lost or corrupted. - .doc .docx who cares!
Something of a repeat of #1. - Work Collaboratively
Students can share Google Docs with each other. - Share and Share a Like (sic)
Something of a repeat of #4. - Export to PDF or Word no problem
Google Docs can be exported to these formats. - Make it Public
Google Docs can be published as a webpage for viewing by anyone. - Work from any computer with Internet access
Google Docs can be easily viewed/edited by you even if you don’t have access to your own computer. - Work on the Go
Google’s Chrome browser offers some limited ability to work on your Google Docs offline. - Because it’s the future
“We’re headed into a fully web-based world.”
Jeff does a good job pointing out some of the strengths of Google Docs, especially for high school students which is who this post is targeted towards. And it’s true that Microsoft’s Word is not everyone’s cup of tea. It’s a large, relatively expensive program with an awful interface and a boatload of features that go unused by most users.
But Word is also the de facto industry standard for creating word processed documents. Period. Anyone who is interested in sharing word processing files pretty much has to have Word in their arsenal, and I think that reasoning extends to high school students, or at least those who are able to have access to that software.
Google Docs has plenty to recommend it, and Jeff hits on some of its strengths. Its a great way of developing a shared document with someone, with the ability for two users to work simultaneously on the same file. Documents are auto-saved, and being able to access one’s work from any machine connected to the Internet can be awfully handy. In addition, Docs is free. I use Google Docs on a regular basis for some of my projects, particularly on those in which I am collaborating with someone else.
The bad news is that Google Docs isn’t quite ready for prime time for anything more than the simplest document. The challenges faced (as of 9/24/2011) by this web application fall into two categories:
- No offline editing of documents–you MUST have an Internet connection if you wish to work on your Google Doc.
- Incomplete feature set (depending on your needs), including
Google Docs is excellent at what it does, primarily allowing users to maintain documents “in the cloud” and sharing them with other people. But to suggest that it has become a viable alternative to the many-featured Word is jumping the gun, I think, unless you simply don’t need the features that Word provides.
And if that’s the case, Google Docs will serve you well… or perhaps you can get away with using an even simpler and more robust document creation tool: the humble text editor.
We’ve touched upon this in the past so we don’t need to belabor the point here, but a text editor allows one to write unformatted, ‘plain text’ documents without worrying about nonsense like bullets, margins, bold or italic fonts, etc. (I’m using a text editor to write this post, actually.) At some point in the future, if that plain text needs to be formatted, it’s easy to do so: copy-paste the plain text into your Word or Google Docs document, select (highlight) the text you want to format, and apply formatting from Word or Google Docs as required. Easy.
Working with a plain text file has some of the same advantages that Jeff mentions in his list above.
- No more corrupt files
A text file is a text file. All computers can read them. - No more corrupt USB Keys [“thumb drives”]
That’s true if you keep your plain text files on a server, which is perfectly possible. (I’m using DropBox and the excellent PlainText app to allow me to work on my plaintext files from multiple locations.) - .doc .docx who cares!
These extensions indicate Word files. Most people use “.txt” to indicate a plain text file. - Export to Google Docs or Word no problem
Via copy-paste, plain text files can be dropped in to other documents easily. - Work from any computer with Internet access
Plain text files stored on a server can be accessed in this way. - Work on the Go
A local copy of your plain text file can easily be synched with the server later on.
In addition to these benefits, you may discover others:
- Plaintext improves your writing
By allowing you to focus on the words themselves rather than what the words will look like, writing in plaintext improves your writing. Don’t get stuck on the style of your heading, or whether you should italicize a word or not. Just WRITE. You can worry about making it pretty later on! - Start writing faster
You don’t need to wait 3 minutes for Word to load up or to log on to Google Docs. Open your text editor and start writing. - Smaller file sizes
Text files are orders of magnitude smaller than the bloated files created by Word—text files don’t have to contain all that formatting information, right? - Improve your Geek Credibility
The lowly text editor is not the sexiest product out there—after all, Notepad (Windows) and TextEdit (OS X) are provided for free with the operating system. But they’re one of the most powerful tools in the geek’s toolbox. Just ask coder Gina Trapani, Google Director of Research Peter Norvig, author Neal Stephenson, and LifeHacker Kevin Purdy.
Thank God for Mac OS X
Thank God for Mac OS X
by Richard White
2011-07-24
There’s a line that rock climbers sometimes trot out when they feel like exulting in the glory of their source of creativity.
“Thank God for the rock. Otherwise, we’d all be surfers.”
In the same way, it has occurred to me on more than one occasion to say to myself “Thank God for Mac OS X. Otherwise, I’d be using Linux.”
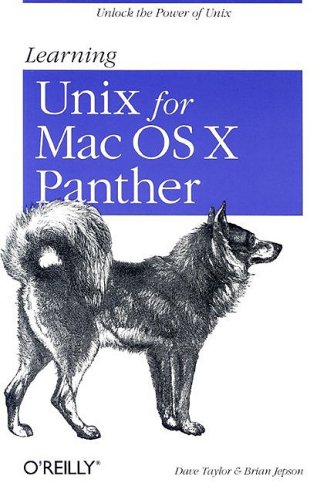
Now the reality of the situation is that Mac OS X and Linux share a common ancestor: UNIX. Actually, the Mac OS X running on all current Apple computers really is UNIX at its core. I’m thankful to the Mac platform in part for giving me a jumping off point from which to learn about UNIX, and later on, Linux. In 2004, O’Reilly published Learning Unix for Mac OS X Panther, by Dave Taylor & Brian Jepson, which turned out to be a great to begin discovering some of the inner workings of the OS X operating system.
One of the best things about OS X, then, is the fact that one can peek under the hood and play around with things a bit. This has always been the case with computers, of course, but OS X’s use of UNIX means that there’s a fairly large base of users with UNIX experience that can assist one in playing with the system, or even running other software on the system—UNIX-based software—that actually isn’t part of the official OS install.
This past week, Apple released the long-awaited 10.7 version of the OS X operating system, named “Lion.” Apple has continued to improve on OS X over the years, and this release included some major developments that many users are going to find very appealing, including autosave, built-in version control, and updates to many Apple apps.
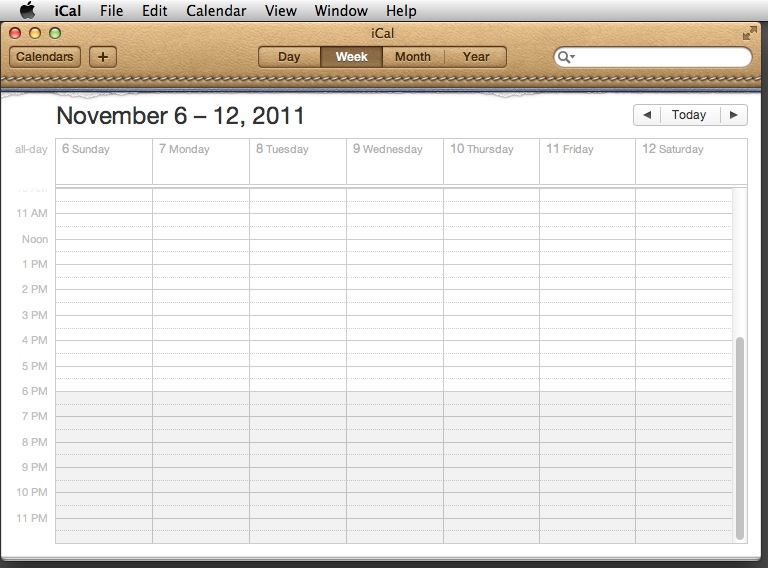
Some users, however, found some of the improvements to be less-than-satisfactory. In an otherwise clean and minimalist User Interface, for example, Apple’s iCal application sports a faux-leather and torn paper skin that is almost universally abhorred by users, for a lot of different reasons: the leather is inconsistent with the overall OS theme, the real life stitching and leather texture don’t contribute to one’s understanding or use of the application, the fake torn bits of paper on the upper margin are silly…
Fortunately, the power of the community stepped forth, and someone came up with a package that allows one to equip that calendar with a skin more appropriate to the UI, and made it available online: http://macnix.blogspot.com/2011/07/change-mac-os-x-107-lion-ical-skin-to.html. Thanks to the carefully written instructions there, my iCal calendar is back to looking like it should.
Apple’s Mail.app program received some interface changes as well, and that got me thinking about investigating some other ways of working with my email. Of course many people have already gone over to using a Web-based email system—Google’s Gmail is the most popular—but I still like the idea of being able to read and compose emails when I’m not actually connected to the Internet; I like having an email “client” on my local machine.
If you’ve used Apple’s Mail, or Microsoft’s Outlook or Outlook Express, or any one of a dozen other programs that run on your local computer, you might be interested to hear about another alternative, one that may appeal especially to the geeks among you.
Next time, we’ll see how to install a modern version of the Terminal program pine on your UNIX-based OS X machine.
Perfect Passwords, Every Time
Perfect Passwords, Every Time
by Richard White
2011-07-20
Man, I am really getting tired of all this talk about passwords.
Okay, okay, I’m one of the people who has been talking about them, but… still. Seriously. Can’t we all just learn how to create awesome passwords and be done with it?
You know all the don’ts, right?
- Don’t use words found in any dictionary, English or otherwise.
- Don’t use any personal information: names, dates, social security numbers…
- Don’t use the same password for multiple uses/websites
- Don’t use a password that is too short.
And then there are the dos, which can be a bit overwhelming.
- Do use a mix of letters, numbers, and special symbols.
- Do use different passwords for different sites, and change your passwords regularly.
- Do use a longer password.
I probably don’t need to spend a great deal of time explaining the rationale behind these rules, which are well-founded. Bad guys do try to guess your passwords, both to important things like your bank account, and seemingly trivial things like your email (which they can use to get your bank account passwords). Bad guys use computer programs to try to guess your passwords. Bad guys look at passwords stolen from other places like Sony and try to use them for your other accounts.
It’s a jungle out there. But here’s how you can deal with it. All you need is a system.
It needs to be your own system, of course. You don’t want to reveal your system, your pattern, your trick, to anyone else, because then they’ll know your system, and will be able to guess your passwords. Not good.
But I’m going to show you my system, and you can use something similar, and then we won’t ever have to talk about how to make good passwords again, mmm-kay? :)
Here’s what you need:
- A root
- A place indicator
- Padding
- A time indicator
Let’s see what those four items mean, and how they can be used to create a good password.
1. A root
The foundation of your passwords is a good root password, sufficiently random that no one will be able to guess where it came from. You will use this same awesome root for every site you use. My personal recommendation is to use the initials of a favorite song lyric or passage from a book.
Some examples:
| “In the beginning, God created the Heavens and the Earth.” | → | ItBGctHatE |
| “Ob-la-di, ob-la-da, life goes on, bra” | → | Oldoldlgob |
| “We, the people of the United States…” | → | WtpotUS |
These are already some pretty good little passwords, but they’re too short (susceptible to random guessing) and they aren’t going to be different based on place. Let’s fix that.
2. A place
We’re going to add, on either side of your root password, one or two characters that are unique to where that password is being used. For this exercise, let’s say that we’re just going to add a single letter before and after our root, and those letters (according to the system I’m using, are the first and second letters in the place name. If I’ve selected “WtpotUS” as my root password, how does that affect our passwords?
| User password on my Windows computer | → | WWtpotUSi |
| Amazon account password | → | AWtpotUSm |
| Bank account password at Chase | → | CWtpotUSh |
Notice how cool this is: Even if someone were to see me typing in my Windows password, without knowing my system they wouldn’t have any idea which of those letters are the root and which are associated with the Windows machine. They wouldn’t even know to look for such patterns, there’s so much entropy in that password.
So now I have a reasonably good password that’s different for different situations. For some people, that’s good enough. But we can do better, and very easily.
3. Padding
We haven’t yet used any special characters in our password—#, &, %, (, @, etc.—and using special characters is an easy way to increase both the complexity and the length of our password. For my situation, I’m going to use the three characters “!@@” both before and after my passwords. My passwords now are:
| User password on my Windows computer, with padding | → | !@@WWtpotUSi!@@ |
| Amazon account password, with padding | → | !@@AWtpotUSm!@@ |
| Bank account password at Chase, with padding | → | !@@CWtpotUSh!@@ |
4. A time indicator
It may be that you want, or need, to change your passwords from time to time. Some systems require this, and other people just think it’s a good idea. One possibility is to include some sort of date signature in your system, but keep in mind that it can’t look like a date signature; otherwise, someone who learns one of your passwords is going to have a big clue about your other passwords.
In my system, I try to change my passwords every 3 months or so, starting on my birthday in February, and append to that the digit of the year. So my passwords from February to April in 2011 will have a 21 included. From May to July the passwords will have a 51 included.
| User password on my Windows computer, with time indicator for February – April, 2011 | → | !@@WWtpotUSi21!@@ |
| Amazon account password, with time indicator for May – July, 2012 | → | !@@ |
| Bank account password at Chase, with time indicator for November, 2010 to January, 2011 | → | !@@CWtpotUSh111!@@ |
And that’s all there is to it.
Okay, okay, I know what you’re saying: “I don’t care about changing my passwords every three months.” Fine. Leave #4 off your list.
Or, “Can’t I just use once special character for my padding, rather than three?” Of course you can—make your own system, based on similar parameters: high entropy (disorder) in your password, and greater length (in order to discourage brute force attacks).
Or, “Do I really need a system this complex for my Webkinz subscription? Probably not, but I know some 8 year olds who are pretty darned protective. Use your password system at your discretion.
It bears mentioning, too, that if most of your passwords are used on the Internet, then a service such as LastPass or KeePass might be valuable to you. They offer true entropy, and site-specific passwords managed by a single master password. Of course, relying on a third-party to manage your security can have its problems too.
Using and maintaining passwords is hard work, but it’s increasingly important that we all have a basic working understanding of what’s involved. Root – Place – Padding – Time is a useful, customizable way of creating and remembering stronger passwords.
Good luck!
How-To: Password Protecting a Website Directory with .htaccess
How-To: Password Protecting a Website Directory with .htaccess
by Richard White
2011-07-19
A friend of mine who maintains a website for his classes recently asked me how to go about creating a password-protected folder for the site. He wants to store materials on there that would be accessible to his students who would use a Name and Password to browse the folder.
In other words, when a user tries to go to a certain location on this teacher’s website, he wants them to have to authenticate with a Name and Password before they’ll be allowed to enter the site.
Here’s how you password protect a folder, in three easy steps.
1. Create the folder that will store the protected material.
For our example, we’ll assume that my account on the webserver is called rwhite, and the website files are all stored in public_html. In that directory public_html, create a new directory “secretstuff”, which is where we’ll be storing our password-protected materials. This folder should have a permission of 755.
(There are lots of different ways to “create a folder”, depending on how you manipulate files on your server. You might ssh in to the server, you might use Dreamweaver or Coda, … If you’re not sure how to manipulate files and directories on your server, learn how to do that first and then come back here!)
So in terms of your websites directory structure, here’s what we have so far (your files and directories will look different from mine–the ones shown are for example only):
/
|---home/
    |---rwhite/
	|---logs/
        |---mail/
        |---public_ftp/
        |---public_html/
	    |---about.html
            |---index.html
            |---secretstuff/
2. Use a text editor to create a text file called “.htaccess” in the folder that you want to protect.
To keep unauthorized users from peeking inside the directory secretstuff, you’ll need to add two additional files to your website that will instruct the server under what conditions it should display the contents.
The first file is a text file called .htaccess that is stored in the secretstuff directory. Note that this filename doesn’t really have a name—it only has an extension (the eight letters after the period). That means that this file won’t show up in most directory listings unless you specifically tell your computer to list ALL files.
Use a text editor—Notepad, TextWrangler, BBEdit, TextMate, vi, emacs, nano, edit, whatever—to create the .htaccess file in the secretstuff directory. The file .htaccess should include these four lines:
AuthName "Secret Stuff"
AuthType Basic
AuthUserFile "/home/rwhite/.htpasswds/public_html/secretstuff/passwd"
Require valid-user
Be sure to save the file with the name .htaccess (including the period in front!). That file should have permissions 644.
What does all of that mean?
First of all, .htaccess is used by the Apache web server to do all sorts of things on your website, and you probably already have a few .htaccess files sprinkled here and there on your site—we don’t want to mess with those. This particular .htaccess file in the secretstuff directory is simply being used to control access to that directory.
The four lines in that file, in order, say:
- Display this name in the authentication dialog box.
- Use Basic http authentication.
- Find the file containing passwords at this location on the server (see step 3 below).
- Make sure user has been authenticated before giving them access to this folder.
The only really tricky part about this step is the location of the password file. Note that the .htpasswds directory listed here is NOT contained in /home/rwhite/public_html—placing that directory in a publicly-accessible folder is a security risk. Instead, the .htpasswds directory is contained in /home/rwhite, which is not accessible by a browser. That location IS accessible to Apache, however, which will look at that location to find out which users will provide what passwords in order to gain access to the protected folder.
So here’s what we’ve got now:
/
|---home/
    |---rwhite/
	|---logs/
        |---mail/
        |---public_ftp/
        |---public_html/
	    |---about.html
            |---index.html
            |---secretstuff/
		|---.htaccess
3. Use a text editor to create the text file called “passwd” that we’ll place in the .htpasswds directory.
As discussed above, the passwd file will be be located someplace where a browser can’t get to it. Here’s where we’re going to put it.
/
|---home/
    |---rwhite/
	|---.htpasswds
	    |---public_html
              	|----secretstuff
		    |---passwd
        |---logs/
        |---mail/
        |---publc_ftp/
	|---public_html/
            |---about.html
            |---index.html
	    |---secretstuff/
		|---.htaccess
Note that if you don’t already have a directory called .htpasswds, you’ll need to create it, and then nest inside it the public_html and secretstuff directories. (Although some tutorials will instruct you to place a single .htpasswd file in those location, creating a directory will give you more flexibility later on, should you choose to create additional .htaccess authentications.) The .htpasswds directory and those nested inside it should all have permissions of 644, as should the passwd file itself.
Now, what actually goes IN the passwd file? For our purposes, it’s going to consist of a single line: the Name, a colon, and then the Password that a user will need to get into the password-protected secretstuff directory.
Assuming we want to allow ImaStudent to access the directory using a password of 123456 (not a very good password, obviously), that one line in the file passwd will contain both of those pieces of information, and look like this:
ImaStudent:EdQXJLHVRhCFo
Whoa, whoa, whoa. Where did EdQXJLHVRhCFo come from? That doesn’t look like our password 123456 at all.
That’s because EdQXJLHVRhCFo is an htpasswd “hash” of 123456. Apache is so security-conscious that it doesn’t even want to know what your real password is—it only wants to store a “hash”, or one-way coded version, of that password. When a user enters their password into the authentication box, that hashed password (the EdQXJLHVRhCFo, converted from 123456) will be compared to the hashed version in your passwd file.
So how do you know what hash to include in your passwd file?
There are a few ways to do this. One way is to go to a website like this one and enter your password into the indicated field.
Or, if you wish to do it yourself on the computer, open up a Terminal and on the command line, type
$ htpasswd -ndb ImaStudent 123456
…and you’ll get a line that you can paste into your passwds file.
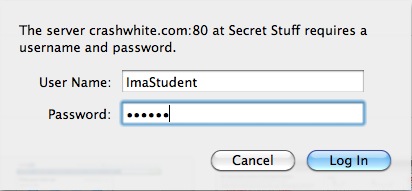
Once you’ve got everything put together, try going to the page that you’ve created and see if you can see anything. If all works as planned, you’ll be confronted by a dialog box that looks something like this.
By typing in the appropriate Name and Password, the browser should proceed to display the previously hidden contents of that folder!
There’s one more thing you may need to take care of, however, depending on how you want to use the new secretstuff folder. If you’re going to use it to serve up regular webpages like index.html then you’re all done: once a user’s attempt to access the directory is authenticated, those pages will appear just as in any other directory.
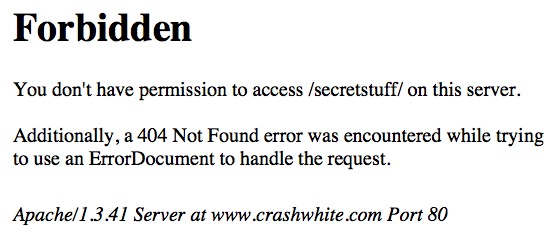
You may, however, wish to just dump a bunch of files into that folder that students can access. They might be text files, or Word documents, or graphics. If this is the case, it may also be that your webserver doesn’t by default allow these files to be “indexed,” or listed, and you’ll get an error message like the one above.
This is easily fixed. In your .htaccess file—the same one that we were working on in step 2 above—add a fifth line:
AuthName "Secret Stuff"
AuthType Basic
AuthUserFile "/home/rwhite/.htpasswds/public_html/secretstuff/passwd"
Require valid-user
Options +Indexes
This line will allow this directory’s contents to be Indexed, or listed, even if there aren’t any html files to be displayed.
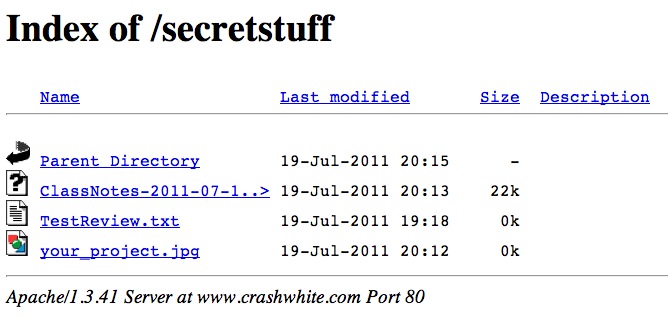
Now students are able to view or download those files simply by clicking on them in the browser window.
