How-To: Password Protecting a Website Directory with .htaccess
by Richard White
2011-07-19
A friend of mine who maintains a website for his classes recently asked me how to go about creating a password-protected folder for the site. He wants to store materials on there that would be accessible to his students who would use a Name and Password to browse the folder.
In other words, when a user tries to go to a certain location on this teacher’s website, he wants them to have to authenticate with a Name and Password before they’ll be allowed to enter the site.
Here’s how you password protect a folder, in three easy steps.
1. Create the folder that will store the protected material.
For our example, we’ll assume that my account on the webserver is called rwhite, and the website files are all stored in public_html. In that directory public_html, create a new directory “secretstuff”, which is where we’ll be storing our password-protected materials. This folder should have a permission of 755.
(There are lots of different ways to “create a folder”, depending on how you manipulate files on your server. You might ssh in to the server, you might use Dreamweaver or Coda, … If you’re not sure how to manipulate files and directories on your server, learn how to do that first and then come back here!)
So in terms of your websites directory structure, here’s what we have so far (your files and directories will look different from mine–the ones shown are for example only):
/
|---home/
    |---rwhite/
	|---logs/
        |---mail/
        |---public_ftp/
        |---public_html/
	    |---about.html
            |---index.html
            |---secretstuff/
2. Use a text editor to create a text file called “.htaccess” in the folder that you want to protect.
To keep unauthorized users from peeking inside the directory secretstuff, you’ll need to add two additional files to your website that will instruct the server under what conditions it should display the contents.
The first file is a text file called .htaccess that is stored in the secretstuff directory. Note that this filename doesn’t really have a name—it only has an extension (the eight letters after the period). That means that this file won’t show up in most directory listings unless you specifically tell your computer to list ALL files.
Use a text editor—Notepad, TextWrangler, BBEdit, TextMate, vi, emacs, nano, edit, whatever—to create the .htaccess file in the secretstuff directory. The file .htaccess should include these four lines:
AuthName "Secret Stuff"
AuthType Basic
AuthUserFile "/home/rwhite/.htpasswds/public_html/secretstuff/passwd"
Require valid-user
Be sure to save the file with the name .htaccess (including the period in front!). That file should have permissions 644.
What does all of that mean?
First of all, .htaccess is used by the Apache web server to do all sorts of things on your website, and you probably already have a few .htaccess files sprinkled here and there on your site—we don’t want to mess with those. This particular .htaccess file in the secretstuff directory is simply being used to control access to that directory.
The four lines in that file, in order, say:
- Display this name in the authentication dialog box.
- Use Basic http authentication.
- Find the file containing passwords at this location on the server (see step 3 below).
- Make sure user has been authenticated before giving them access to this folder.
The only really tricky part about this step is the location of the password file. Note that the .htpasswds directory listed here is NOT contained in /home/rwhite/public_html—placing that directory in a publicly-accessible folder is a security risk. Instead, the .htpasswds directory is contained in /home/rwhite, which is not accessible by a browser. That location IS accessible to Apache, however, which will look at that location to find out which users will provide what passwords in order to gain access to the protected folder.
So here’s what we’ve got now:
/
|---home/
    |---rwhite/
	|---logs/
        |---mail/
        |---public_ftp/
        |---public_html/
	    |---about.html
            |---index.html
            |---secretstuff/
		|---.htaccess
3. Use a text editor to create the text file called “passwd” that we’ll place in the .htpasswds directory.
As discussed above, the passwd file will be be located someplace where a browser can’t get to it. Here’s where we’re going to put it.
/
|---home/
    |---rwhite/
	|---.htpasswds
	    |---public_html
              	|----secretstuff
		    |---passwd
        |---logs/
        |---mail/
        |---publc_ftp/
	|---public_html/
            |---about.html
            |---index.html
	    |---secretstuff/
		|---.htaccess
Note that if you don’t already have a directory called .htpasswds, you’ll need to create it, and then nest inside it the public_html and secretstuff directories. (Although some tutorials will instruct you to place a single .htpasswd file in those location, creating a directory will give you more flexibility later on, should you choose to create additional .htaccess authentications.) The .htpasswds directory and those nested inside it should all have permissions of 644, as should the passwd file itself.
Now, what actually goes IN the passwd file? For our purposes, it’s going to consist of a single line: the Name, a colon, and then the Password that a user will need to get into the password-protected secretstuff directory.
Assuming we want to allow ImaStudent to access the directory using a password of 123456 (not a very good password, obviously), that one line in the file passwd will contain both of those pieces of information, and look like this:
ImaStudent:EdQXJLHVRhCFo
Whoa, whoa, whoa. Where did EdQXJLHVRhCFo come from? That doesn’t look like our password 123456 at all.
That’s because EdQXJLHVRhCFo is an htpasswd “hash” of 123456. Apache is so security-conscious that it doesn’t even want to know what your real password is—it only wants to store a “hash”, or one-way coded version, of that password. When a user enters their password into the authentication box, that hashed password (the EdQXJLHVRhCFo, converted from 123456) will be compared to the hashed version in your passwd file.
So how do you know what hash to include in your passwd file?
There are a few ways to do this. One way is to go to a website like this one and enter your password into the indicated field.
Or, if you wish to do it yourself on the computer, open up a Terminal and on the command line, type
$ htpasswd -ndb ImaStudent 123456
…and you’ll get a line that you can paste into your passwds file.
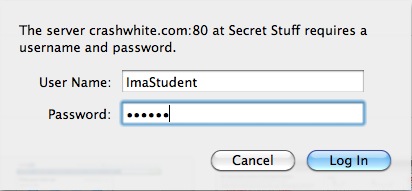
Once you’ve got everything put together, try going to the page that you’ve created and see if you can see anything. If all works as planned, you’ll be confronted by a dialog box that looks something like this.
By typing in the appropriate Name and Password, the browser should proceed to display the previously hidden contents of that folder!
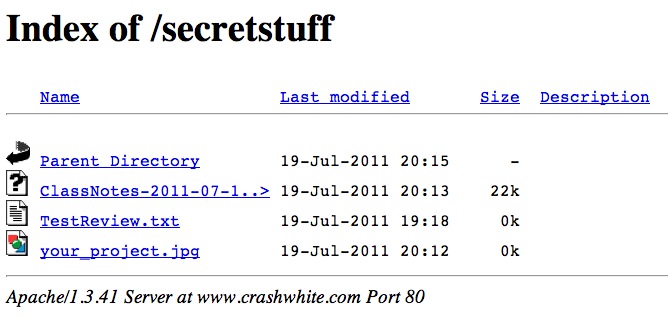
There’s one more thing you may need to take care of, however, depending on how you want to use the new secretstuff folder. If you’re going to use it to serve up regular webpages like index.html then you’re all done: once a user’s attempt to access the directory is authenticated, those pages will appear just as in any other directory.
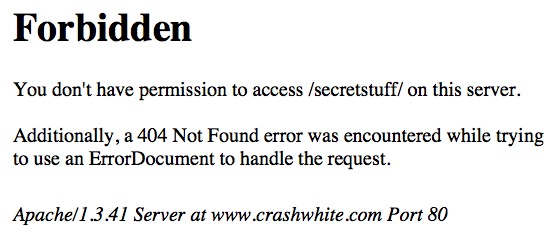
You may, however, wish to just dump a bunch of files into that folder that students can access. They might be text files, or Word documents, or graphics. If this is the case, it may also be that your webserver doesn’t by default allow these files to be “indexed,” or listed, and you’ll get an error message like the one above.
This is easily fixed. In your .htaccess file—the same one that we were working on in step 2 above—add a fifth line:
AuthName "Secret Stuff"
AuthType Basic
AuthUserFile "/home/rwhite/.htpasswds/public_html/secretstuff/passwd"
Require valid-user
Options +Indexes
This line will allow this directory’s contents to be Indexed, or listed, even if there aren’t any html files to be displayed.

Now students are able to view or download those files simply by clicking on them in the browser window.

